This guild is 300 members strong. Visit them at their website http://www.seasidepiecemakers.com/ to learn all about their many charity and other activities.
They have a quilt show next year on March 12 & 13...and don't miss their fabulous opportunity quilt!
The day started with "Taming the Scrap Basket", and I am happy to say nobody passed out when I revealed the quilt top I have to keep hidden in a bag during the lecture. Not all scrap quilts are pretty!
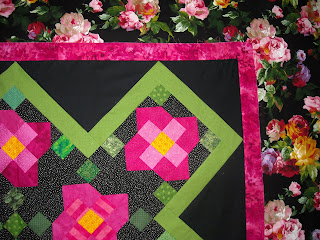
After lunch, we started into the Mystery Quilt I designed with a seaside theme and named "Shining Sea".

Here it is at home on my design wall...a block for the sky, a block for the sea and another for the beach. The sun is paper-pieced with strips.
But wait!
There's more!
This is the most unusual quilt I have ever designed for a Mystery Quilt class, because it has TWO SIDES!
Here is the other side....

These are planned to be opposite sides of the quilt and with careful basting are quilted together (these photos are the unquilted tops, though).
Originally this was designed as a huge quilt with the Sun on one end and the Moon on the other, then dropped down to a baby quilt size, then ended up 2-sided. WHEW!
The class included very brave quilters from beginners to experienced, and they worked hard to make the blocks without having any idea at all what they were making!
In the end, all came out fine, and I am looking forward to seeing some completed quilts.
I especially liked all the ideas they had for making their own creative choices...one will be made a bit smaller and done as two separate pieces, others were planning some wonderful applique additions.
This one definitely wants to be a pattern, which will also have the large one-side quilt design directions.
I should have had more pictures, but instead of being in my purse, the camera was riding around in my husband's car! It was hiding in the glove compartment, where I had to stash it before going into the Crosby, Stills & Nash concert last week.
Darn...no concert pics and no class pics, either!
I suppose this is why there are cameras in cell phones. Except mine.
But don't worry....the camera is back by my side, and ready to take you through the Big Quilt Show (QuiltFest) again this year. Things will be starting up on Sept. 12 with Take-In Day. If I'm careful, I may be able to take some photos at judging, and of course you'll get to see set up, the show & take down!
Meanwhile....I still have two quilts to finish!

 Here's the "Welsh pear" or paisley as we often know it. You can see the remnants of the chalk out line I drew. Many of the these designs are shapes that are outlined with a double line (heart, leaf, pear), then filled with smaller traditional shapes.


 I'll give you a list in Part II..there is one more!


 There are several leaf shapes in there somewhere!
 The less you need to mark, the more freedom you have
 Shopping for remnants only provided one tropical piece...very pretty! But I had to go root around in the discount home dec. at the back of The Big Box Store to find that green. It was $3/yard, so I took it all...2+ yards.
 Honestly, I did not want to figure out too many numbers, so I folded the yardage in thirds, and just cut it up the fold (yes, it's hanging on my design wall). That way I knew I would make 3 bags. Three is a number I can manage.
 The longest part of the fabric goes around the sides. I grabbed the nearest tote in my studio and measured it quickly for some general guidance. It was 15" tall , so I whacked my green fabric at 23" (plenty to make the bottom and a nice sturdy top hem) and then knew I would use the rest for the handles, whatever that turned out to be.


 Nobody is really going to notice. Not the sewing. But they will notice how pretty the bags are...I always get compliments when I'm at the grocery!
 I made each of the 4 bags different, just because I felt like it!

 OOOOO, that tropical fabric just does all the work! How I wish I had found more. That's 2 sides of the one bag.


 Even better is the Batik Wall! I really had to get myself under control and focus on my sister's curtain fabric...which I still haven't exactly figured out yet.
 This shop truly has something for everyone, and it's well organized so you can figure out where to go. I didn't get pitures of all the rooms. There's also a section for children, bolts of wool felt in the alcove by the restroom, and if you keep wandering around you will eventually find the giant warehouse section filled with holiday fabrics and a wall of sale bolts ($4/yd!).
 Yes, there's even a place for the delicate & dainty...buttons, special threads and trims of all sorts.
 Just a fat quarter, but I had to have it...all I got on the selvedge is "Colonies Poison Green".
 I was looking for some beachy stuff..the blue turned out to actually have a wood grain between the stripes (company unknown). The footprints are cute (Makower) and have been around for awhile in several versions.
 Rainbow's End has a lot of the food fabric prints. I couldn't resist these two fat quarters after I'd taken a picture of that box of doughnuts at the start of this trip! They're from Cosmo Textile Co. Ltd. I can see them made into a little bag to go inside a purse. You know, for your secret doughnut fund!
 I love black & whites. These really don't have enough background showing to fit my guideline that the fabric should read either black OR white...but those buttons are too cute! Especially as reverse-value prints. (company unknown)
 If only my camera would do this real justice...it's a riot of color! Thanks to Free Spirit for printing this fun stuff...I got several yards.
 The red & brown is Tranquilty by Moda, and the retro brown & teal is All That Jazz by Windham. The colors are remarkably good with the coffee cups wallpaper border my sister has, and the inspiration for the curtains.


 Just a peek inside...old fashion comfort, with very amusing art on the wall. The main theme seems to be dogs and why they are superior to a large part of the human race!

 One of two large cutting tables...oh, yeah, I could work at this shop!
 I must have some Black and Whites! What a fine selection. And I highly reccomend the black-on-black prints when you find them. Deep and textural, they have nothing in common with the "white-on-white" fabrics. The B-o-Bs don't have that painted on, gum up the needle effect.
 Hands off my stash!
 Down a hallway from the cafe, impossible to resist...it's the Fabric Sale Room!
 A good candidate for the coffee curtains project, this is from Windham's Baltimore Album line.
 This Fairy Frost is actually pale green. The cherries are a Wilmington Prints piece.
 OOOOOOO...blue batiks! The center one has loads of tiny turquoise dots. I am writing this only a week later and I have used up the dots already!