Thursday, December 11, 2014

Quick Gift: Microwave Bowl Cozy

Sewing a last minute gift is practically a tradition for most quilters. This year the Microwave Bowl Cozy (yes, it just a giant pot holder!) seems to be all over the web, so here are my directions for making it:

SUPPLIES
Microwave safe 100% cotton batting--TWO 15" squares (see fabric below)-- I used Wrap & Zap by the Warm Co. They are no longer making Warm Tater, but say that Warm & Soft is the same...I could not find that in the Big Box store. You want something without a scrim (which Warm & Natural has, even though it says 100% cotton). I have never heard a personal experience of batting catching fire in a microwave, and suspect it might happen only if you cook something too long! But I also did not want to run my own test!

100% Cotton fabric-- TWO 15" squares-- you can measure a bowl or plate and make a custom size, but I think this will fit anything pretty well. It could be larger or smaller, but cut the batting to same size, to make two pairs of fabric & batt. They can be different prints/ colors, etc.

MACHINE SET UP This is the stuff nobody thinks to tell you about before you get started!
Use a size 90/ 14 needle, because you will be going through a lot a layers before you're done (esp. if you have a chosen a BATIK for this or pieced the squares).
Match your bobbin to the top thread! Just do it now so you don't have to wish you had later.
You can sew the whole thing with a walking foot if your machine handles lots of layers better with one. If so, put it on now.
Use a slightly longer stitch length...do not sew this with teeny tiny stitches.

SEWING
1. Sew an X on each fabric/batt pair, corner to corner.
The two pairs, different sides up
You can see a little zig-zag at the bottom right! It's perfectly OK to piece your batting so you can use the whole package.

2. Make a dart in the center of each side: fold the square in half Wrong Side out, and mark 1" away from the fold, and 2.5" down along the fold. Draw a line to connect the dots (I used a Sharpie). Pin to hold. 
Draw a sewing line for the dart
You can mark two sides, then re-fold the square and mark the other two before sewing.
Each square/pair gets four darts. You can start sewing from either end, and it only has to be back stitched at the point on the fold.
Zig-zag batting join will never be seen!
3. Use your scissors to trim the excess dart fabric. The sewing and  trimming do not have to be precise. be sure you have 4 darts in each square/pair before the next step!
Nobody cares how wide the seam allowance is
4. Place the two square/pairs Right Sides together, one "inside' the other. Pin to match at the darts and corners. Take my word, you want the darts in BEFORE you sew it all together! Unless you'd like a cozy that matches my personal one, which was supposed to be a gift, but ended up with darts on the outside.
Don't worry, it looks better when it's done!
5. LEAVE AN OPENING about 3" when you SEW all the way around. You know why I put that in caps right up front! Sometimes I start by back stitching, then lift the pressure foot and pull the item though a few inches, then back stitch and sew the rest of the way around. The seam allowance can be 1/4", or less, or maybe different on each side!

6. Turn the cozy Right Side out...poke out the corners (nobody cares if they aren't sharp...in fact, you may want to sew the next one with rounded corners!). Top stitch all around.
I like to close the opening as I top stitch, and usually trim the batting out of the seam allowance there first. You could hand stitch it closed, especially if you want to top stitch more than 1/4" in from the edge and avoid the extra batting layers.
Lots of layers do well with a walking foot. My Janome 7700 has a special one.
7. Most of the instructions end there, but I like a final step to hold the two layers together. In the center of the bottom, sew a little square or just tack in place. That X sewn can be pinned to line up, but it really doesn't matter.
This means you can throw it in the wash, which is a good thing for any item that is used in the kitchen!
One stitch in the center would be enough
Well, that's it! Quick and easy, as well as being very useful. Tell your giftee it just goes right in the microwave with the bowl or plate, ready to protect their hands when they remove the dish. And remind them it can be washed!
I even patched batik scraps for this
Sure, you can use patchwork for one or both sides (it's really 2-sided) or maybe a nice holiday fabric. If the shape seems a little odd, I'd just put a plate of cookies in it, fold in the corners and tie it up with a ribbon. 
Be sure to mention if the plate is microwave safe OR NOT! I got some metal ones from the dollar store, and they are NOT.

As with any simple item, you can get quite creative. But you can also make one of these cozies pretty darn fast!


Thursday, November 20, 2014

Scrappy Gift Tags

Holiday gift sewing can sure cause a blog to go missing...how can I show what I'm doing when you-know-whos will be reading?
So as slight diversion, here is a little tute on what I did today: Making gift tags! Fused, naturally...and of course with SCRAPS!
Often holiday theme fabrics are kept as a separate collection, but the scraps work just the same. There are always more-more-more, no matter how diligently you apply yourself to using them.

I used lots of scraps, or fabrics that had finally reached their perfect vintage***, to make gifts for the family members I will see at Thanksgiving. I dug into my Christmas collection and even made wrapping for those gifts! But I needed some tags to be sure they didn't get all mixed up.
An index card with fabric fused to the lined side seems to be just about right. To the ironing board!

First, lay down some paper-backed fusible web (I use WONDER UNDER) with the glue side up...that's the side that feels rough.
Place the fabric Right Side up on the fusible.
As a student of the Chicago School of Fusing, I have saved many large pieces of the release paper from using Wonder Under. Other fusibles do not have the same type of paper, so that's why I prefer WU.
That paper on top in the picture is one piece. By placing that on the fabric, I don't have to worry about making sure the fabric is larger than the fusible, or the fact that there are some areas not covered by fabric. The paper will protect my iron. I can move it around until all the fabric areas have been fused.

Hot iron...no steam!
Cut off the extra WU hanging over the edge, and trim the excess fabric at the side (Oh, no...looks like 2 new scraps to me! Was I brave enough the throw them away?)

This excess fabric is currently in the trash...as of this posting, anyway!
It is important in all fusing that the glue be right to the edge of the fabric (or other item...you can fuse to almost anything that you can put a hot iron on!). I like to trim into the fabric a bit.
Trimming to be sure the glue goes all the way to the edge
The fusible needs to cool before removing the paper...especially important if you have fused a large piece of fabric and intend to save that valuable release paper.
But we do get impatient!
If it's still warm, use a pin to scratch through the paper, then crack it open and peel off. That is much better than picking at a corner!

I like a big fancy pin!
The Wrong Side of the fabric is smooth because the glue is now fused there. The paper is smooth because the glue is gone. If anywhere is rough, it needs more heat time.  Just put the paper back and press again.
Try not to over-heat...5--10 seconds is enough.


OK! Now put a large sheet of release paper on the ironing board (both sides are the same) and lay out the index cards, lined side up.
Place the fused side of the fabric on top. Check that it doesn't extend beyond the paper...if so, add some more paper. Or just be really careful ironing at the edge!

Index cards come in lots of colors, but I just had white.
Here are the cards fused to the 2 different fabrics:
A nice clean side to write on.
Then I cut the cards out and gave them a tag shaped end. You could do this with a rotary cutter and a fancy blade, too! Or cut them into ovals or anything else you like...they are your tags!
Free-hand cut the end or use a real tag as a template
I used a hole punch to put 2 holes in each one, as I decided to sew the tags onto the fabric gift wrap.
The 2 little ones were a tag I accidentally cut into...but nothing gets wasted!
Using gold embroidery thread, I went in one hole, through the fabric, and out the other. Then cut the thread very long, and used it to tie a bow. (I did write the names on first!).

There you go! Have at it and make some better/ fancier tags than these. I think it would be fun to fold some into little book shapes.

FYI: I buy WonderUnder on sale and get several yards. I keep it on a cardboard bolt center.
Another use for a string scrap!
I save the release paper sheets clipped together and hanging behind the ironing board so they are handy.
Two clips hanging on a pin in the design wall
If you can't get or don't prefer Wonder Under, I highly recommend PARCHMENT PAPER. Find it with the freezer paper at the grocery. It makes a great release paper, over and under anything you are fusing. You can roll it out as long as your ironing board!

***as motivation for using fabric (some I have had for over 30 years), the new answer to "What am I saving this for?" is TODAY! I declare that all my fabric has reached the time it was being saved for!

Friday, October 24, 2014

Singer Featherweight Model 221

A 1938 Singer Featherweight is one of the sewing machines I inherited from my mother. She got it at a yard sale for $25 because "It's a pretty small machine..." The guy was asking $50! They sell for $350 and more today.
Yes...it IS a small machine!

She really enjoyed taking this to classes and even sewing on it at home...among her many other machines. That collection included some treadles, hand-cranks, toy and electric models. I took the electric ones and the rest were sold to other collectors. They should be with people who appreciate and use them...plus it was my husband's nightmare that I would bring home all the machines!
(Mom had already given me a nice treadle...)

So after these almost 11 years, I decided I should take care of this baby. The local quilt shop was having a class about how to maintain your Featherweight, conducted by  The Old Sewing Machine Man, Johnny Johnson. He and wife Debbie are experts in old sewing machines, attachments and supplies. They travel to quilt shows and other events, sharing their love of everything pre-computer and providing lots of help to others. I always enjoy seeing them and admiring the machines they bring for sale.
Johnny started off with a history of the Singer Featherweight and how the original machine (made as the Standard SewHandy) was not well thought of by the sales people...so they didn't show it to anyone! But at the World's Fair in 1933 it was on display and everyone who could sew wanted one. They weigh 11 lbs. Have you ever picked up a regular sewing machine? Back in the day, those things clocked in at about 35 lbs!
Having the original case is a nice touch:
I kept Mom's ID tag...you don't want your machine to be mistaken for the others!
The most important thing here is DO NOT let those catches snap open! The spring inside will eventually break, and they are expensive to replace. Everyone likes to let them snap open, but you should hold a hand over the latch so it doesn't fly up.
A supply tray sits on top of the machine...it also has the original book!

After that, step by step we went through the 42 places that need oil!
Modern machines are sealed up and even boast of not needing oil (some take a bit in the bobbin area). You only use a tiny drop, but some of the places to oil are almost invisible. Maybe Singer wanted you to take it to a repairman. However, these old machines are wonderful because you can do a lot of your own work on them.

The only thing I couldn't finish in class was putting in a new felt pad. It goes inside on the bottom, and acts to absorb all the oil (and grease...yes, there is that, too!) that can drip off. The felt on my machine was fused to the bottom plate, so I had to get the new part, then scrape off the felt when I got home. It had soaked up a lot of gunk since 1938.
You should be glad you can't really see what it looked like. That's the new felt on the right.
The serial number will tell what year the machine was made. Some were made until 1964, and some were made in Canada, Scotland and other places. A few versions were made in green or ivory color, but by far most are black. Some of the refurbished ones have been painted in fun colors, since the old finishes and decals may have been worn away.

I was happy to see several people I know also were taking the class! One had a newly maintained machine, but was learning for herself. Another had two machines with her...and another still at home! We had fun finding small differences in models from over the years. Most had the original foot control, which was used by Singer for most of their machines well into the 1960s:


The oldest ones have some metal parts, but the same design
I never have been able to figure out what the designer was going for with this. It is about 6" long, and the actual power comes from the button on the right. But I am positive (after so many years of teaching and seeing so many machines) that this is responsible for the many people who learned to sew barefooted, and continue to this day. 

Mom liked to give things names, like "SuzyBelle", but I cannot remember if she had one for this machine. Maybe if I sew on it for awhile I will think of one.
My quilt guild retreat is in November, and I think I'll take this along. Maybe I'll invite the other Featherweight owners to bring theirs, too...it would be fun to see a bunch of these little guys purring along together!
They only make a straight stitch, but they do it oh-so-well! And that's all a quilter really needs.

Visit The Old Sewing Machine Man's website: www.theoldsewingmachineman.com

Learn more about Featherweights:
http://planetpatchwork.com/fweight.htm
(scroll down for the chart that matches serial numbers with the year they were made).

Read the book:

Featherweight 221 - The Perfect Portable: And Its Stitches Across History ...

 By Nancy Johnson-Srebro (this includes a re-print of the original manual that came with the machines)

Monday, October 13, 2014

Making Scraps...and some progress!

I have a dream.
It is to get the commercial prints (i.e."stash" or 20th/ 21st Century Fabric Collection) off the shelves in my studio. Then I will put my batiks in there!
Have you tried some of the many "stash reduction" ideas around on the Internet? I do have to say, the idea of cutting it ALL UP and enjoying a wealth of pre-cut strips and such is a lovely idea!
However, some of these fabric s have been with me longer than my son. I know I have used bits, as the ends are cut up funny (from back in the day of templates! yes, I am really showing my age now!).
I have to trick myself into it. I have to make some "rules" or guidelines or something...but then my heart takes over and I just can't cut it all up. Do I still think I will need for "that perfect project"...the one that has not come along in over 30 years???
Yes. Yes, I actually do.
Well, now that is something to deal with! So my latest rule/guideline is if it's half yard-ish or smaller it must be all cut up. But it's OK to cut one 6.6" strip and one 5" strip first....just in case I need something wider than a strip! And I should do this as I am looking in the stash for anything else.
I needed an interior border for a scrap quilt, and found these pieces today:
I have had that dark stripey one for about 33 years!
The neutrals were what I was looking for, but I am proud to say I gave a stack of green a sort-through, and that pink just showed up! One stack at a time, I may get there...

The best way to follow through on a plan is to tell someone about it, so I shared my idea with Cherry-Cherry at lunch yesterday. She has the ability to show both support and doubt all at the same time.
It's because she knows me really well!
I did it!

This means I need yet another plastic box for those wide strips! But I really am enjoying the big box of 2.5" strips (see below), and I also like 1.5" strips, hence the little pile on the left of the pic above. All this is going to come in handy in a month when it is time to go on the guild's Retreat...I see hours of lovely, brainless sewing resulting in Log Cabins, Nine-Patches and who knows what else!

Oh...that box:

This was after making 58 scrap blocks!
I can't show the scrap quilts (3) I made with the blocks because they are for the Mystery Quilt class in February!
But the real mystery to me was that I got thinking:I  used up almost all the scraps in my scrap container...but I was sure I had more scraps!!! Where did they go?
And then I remembered. I gave a load of scraps & fabric to the guild's yard sale:
I actually gave all of this away!
Instead of feeling discouraged, I am just feeling amused, and will continue to enjoy the process.
There could be a lot of scrappy quilt tops to sell at QuiltFest next year and for  charity quilts. I know I will never be able to do the quilting on all of them!

Oh, by the way...(and this is really why there is NO END to all this)...here is a pic of my scrap container, which has some new contributions, plus my latest new scrap collection in the bag: stringy odd ends for a string quilt!
At least I have not been saving all those for 30 years!
A moment in time when you can actually see the studio floor!


Wednesday, October 1, 2014

The Year of the Scraps Begins!

Now the the big quilt show is over, it's time to get back to making quilts!
In fact, there a brief respite between Judging and Hanging that allowed me to make this:
Another dark bordered quilt on a navy blue sofa...sorry!
Very easy and fun!
I don't know where I got the idea, and it certainly looks like something that several people come up with at the same time. The strips used were all 2.5". My thought was how to use 4-patches and 9-Patches in the same quilt, from the same size strips.
This is one you could play with the colors and value placements for a long time and enjoy different results.
Pat-on-the-back: I even finished making a binding for it today! Now how long before it gets quilted???

October is here, and it feels like this should be the New Year, instead of waiting for January to roll around. So I am declaring this The Year of the Scraps (for me...but you are welcome to join in!).
I've made a good portion of my stash into strips, and I want to continue that trend. I like to consider and use pre-cuts as scraps!

There are many interesting blogs about scraps. Bonnie Hunter has one that is chock-full of patterns and ideas. Joan Ford is another. They have some advice for how to cut up your stash, as does the Craftsy class with Nancy Martin, "Strip Your Stash!".

Just cutting a 2.5" strip (soooo popular!) from every fabric you own would be a great start. You might even get brave enough to cut up an entire piece of fabric and be done with it!
Just remember, if there's just an odd bit left over, yes...it is a new scrap!
And if it's a wobbly shaped strip, then you can use it in a String Quilt!

If you want to check in on my Year of the Scraps, use the "SEARCH" box over on the top of the sidebar. I'll label all these posts as SCRAPS.

Friday, September 26, 2014

QUILTFEST 2014

It's showtime, friends!
QuiltFest is on through 5:00 pm tomorrow (Saturday Sept. 27), and the quilts are beautiful! There are 480 in the judged part of the show.
I'm giving a short talk in the demo area today at 12:30: "How to Look at a Quilt...and Then Talk About It!"
The next post will be a brief re-cap of that.
Meanwhile, here's a picture of the All-Stars' lovely table...who will win that raffle quilt tomorrow afternoon?
"Summer Solstice" won the Honorable Mention!
Looking ahead: Get ready for a load of SCRAP QUILTING!

Friday, September 19, 2014

New Toys: Open-Toe Accufeed Foot & a Needle Inserter

I love to get something new, and recently I got two new toys for my Janome 7700 sewing machine.
The first is the Open-Toe Accufeed foot:

Perfect for in-the-ditch!

I have had several sewing machines, and on every one my favorite foot is an Open-Toe Foot. It's possible to see exactly where the needle is going. While the fabric is in good contact with the feed dogs, I can still move it just a bit, which makes this the perfect foot for in-the-ditch quilting.

My Janome machine has an Accufeed system to help with multiple layers. The feet are specially designed to work with a an extra set of feed dogs that come down from behind the foot and integrate with it. This is especially nice for things like binding and, of course, quilting!
I also have a 1/4" Accufeed foot, as well as the standard one that comes with the machine.

My other new toy is amazing...because it is soooooo handy, and also cheap!
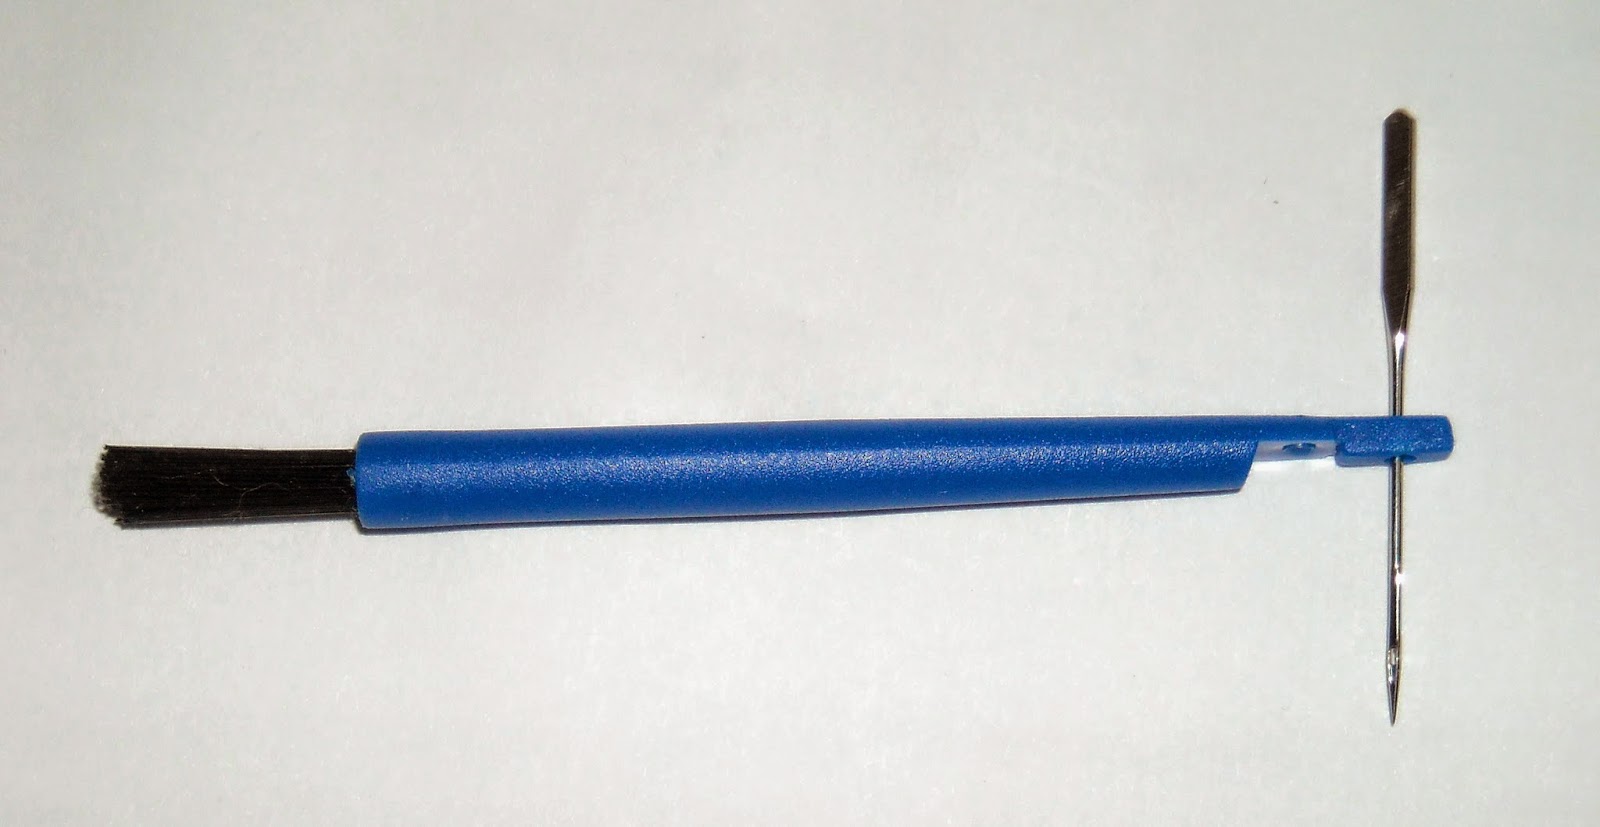
It's the Dritz Needle Inserter with Brush:
Brush for cleaning, needle holder for inserting!
I think this cost less than $2, and you can get it almost anywhere. There is a similar fancier thing that has the needle inserter and a threader.
Why I did not already have one is a total mystery!
Maybe it was easier to change needles on my other machines, but this makes it a breeze...and yes, it is just a 3" piece of plastic with a hole in one end!

I have many brushes, as I'm a firm believer in swabbing out the bobbin area as often as possible. That is the #1 repair job the shops do, so why not save yourself $89 or whatever the going rate is? OK, it's a good idea to have the whole machine cleaned occasionally, but you can avoid an annual cleaning if you do a little maintenance yourself.
The brush is a nice little stiff one, which allows you to stab into the linty areas and pull away quite a large bit. First you stab and pull out, then you brush with a wiping motion.
I never thought I'd be writing about how to get rid of lint.
And I bet you never imagined you'd be reading it!

Quilt Show Season is upon us, and I have just been through 3 days of assisting with the judging of 480 quilts for QuiltFest (Sept. 24-7).  It takes a lot of people to handle all those quilts properly! Our judge Jane Hall (NQA certified) was the best.
Next week we hang the show. I have been assigned as Team Captain for the Small Art Quilts! So look for some reporting from the show.

After that, it's time to go into a very Scrappy State of Mind as I gear up the guild for a Mystery Quilt class next February. 

Thursday, September 11, 2014

Making Scraps!

I am working on a Mystery Quilt class for my guild...one that will use scraps, as they requested.
This would seem to be a good way to actually reduce the contents of my own scrap container. 
I dumped it out and sorted by values (all that will be covered here soon!), then proceeded to cut it all up. OK, except for the solid black and solid white fabrics that I didn't want to include. And there were some too-small pieces...all that went back into the container.
I even decided to do a scrap background, and that took up quite a bit of the light colored fabrics.
After sewing almost everything I cut....which I can't show you, because it's for a Mystery Quilt...I was within 10 blocks of having enough for 2 quilts! So I raided my stash, because, after all, it's just like a big scrap container! And I am trying to get all the commercial print fabrics out of the studio cupboard so I can replace them with my BATIKS!
Here's the sad-but-true thing about scrap quilts: you cannot use up all the scraps. In fact, you will probably make more scraps...which is what I did:
Scraps of scraps!
The 1/4 full container is now back to almost full, and I also got some nice little pieces for the Mile-A-Minute box (on the right).
It reminds me of a favorite poem, by Lewis Carroll, "The Walrus and the Carpenter" from Through the Looking Glass.
This part:

The Walrus and the Carpenter
Were walking close at hand;
They wept like anything to see
Such quantities of sand:
"If this were only cleared away,"
They said, "it would be grand!"

"If seven maids with seven mops
Swept it for half a year.
Do you suppose," the Walrus said,
"That they could get it clear?"
"I doubt it," said the Carpenter,
And shed a bitter tear.


But they are different scraps than the ones I started with, so no tears are being shed!

Wednesday, August 6, 2014

How to Price Your Quilt

74" x 53" quilt for sale
You'd like to sell a quilt you made, so how much should you charge?
Follow along with me as we consider all the things that go into setting a price. There are some formulas in this post, which can help you explain your price to a buyer. But only you can set the price to ask.

Let's get one thing out the way first...
Your Quilt's Value = PRICELESS
That's right, nobody else could have made that quilt in the way you did. It is priceless, and should only be given as a cherished gift. There is no amount of money that could possibly be equal to the materials, time and loving creativity you put into it.
That said, let's look at what really has gone into your quilt. We are talking about a quilt to use, not an art quilt for the wall.
I will keep the math as simple as possible!


FABRIC
There are so many variables, what we are looking for here is some ballpark figures to guide our final pricing decision. Please feel free to round up those decimals!
You may have receipts for the fabric you bought, and that could help. But chances are that you used some new and some from your stash. It doesn't matter where the fabric came from or when you bought it, the money you'd have to spend today to replace it is how to figure it's worth.
Quilts, Inc.reported in 2010 the average cost of a yard of fabric used by quilters was $9.90 (the 2014 survey of the quilting industry will come out in the Fall). A quilt appraiser will value the fabric today at $11 --13 per yard, more for batiks.
If you have the pattern, add up the yardage required and multiply by an average cost per yard.
Or take the measurements of the quilt and figure the square yardage in it:
Side A" x Side B" = Square Inches 
Divide Square Inches by 144 (Square Inches in a Sq. Foot) = Square Feet 
Divide by 10.7 (SF in a Square Yard_ = Square Yardage of the top...but...
that's just the part you see. Add another 1/3 for the seam allowances (more if you have lots of seams).
Here's the quilt above:
74 x 53 = 3922 sq. inches...  Divided by 144 = 27.23 sq. feet...Divided by 10.7 = 2.54 sq. yards 
(or divide the Square Inches by 1512, which is Sq. Inches in a yard...this is what calculators were made for!).
Add 1/3 more for the seam allowances (in this case 2.54 divided by.84) and we have 3.38, which I am rounding up to 3.5 so my head won't hurt so much. 
Keeping it simple, double that amount to include the backing, and add 1/2 yard for binding, so we have 2 x 3.5 = 7 1/2 yards.
That's $75 in just fabric...for a lap size quilt.

OTHER MATERIALS
This quilt is right between a Queen size and a Crib, so we need a Twin Batt about 72" x 90".  I just averaged the cost of 5 batts at JoAnn (cotton, poly and mixed) and got $20 (range was $11.99 to $27.99).
How about thread? First you piece or applique, then you sew the top together, then you quilt. Whew!
Aiming at ballpark averages again, let's say $4 a spool...Coats & Clark is cheaper, top quality is higher, bobbin thread (60 wt.) is different, and the quilting thread could be higher, too.
But let's say you use 2 spools to piece the top (including bobbin) and then another 4 spools for the quilting.
That's a very conservative $24 of thread, for a minimal amount of quilting, as in our example. You could easily use 8 spools for quilting.
If you pay a long arm quilter, that entire fee needs to be added to your costs. I did the one above, but it could have cost between $60 and $225 (and worth every penny, as the long arm quilting relieves you of the basting, too!)
So at this point we have $119 in materials, if you do it all yourself. That does not include the thread/basting spray ($6.50) and needles used, not to mention the electricity for the sewing machine...or wear & tear on that machine, rotary cutter (you used up a $5 blade, too), scissors, pins, etc etc etc! Those would be valid business expenses, but for our purposes we will chalk that all up to doing this because we like it. Always remember that a "hobby" is not free, and being an amateur means you do it "for love", not that you are no good at it.

TIMING IS EVERYTHING...or nothing
So that's our big sticking point: we did it for love, so how can we charge for that?
But maybe you hated making this quilt (that's why it's for sale), or you've run out of room for more quilts, or you really DO want to make some money (even if it is for more fabric!).
How long does it take to make a quilt?
Unless you've punched a time clock, that is hard to answer! It goes from "X years (your lifetime of experience)" to 20 hours for a small simple quilt to 4 hours for a printed panel you bordered and cross hatch quilted for a baby quilt. 
You chose a pattern, shopped for fabric, cut, sewed, quilted and put on the binding (which, BTW would cost about 35 cents per inch for someone else to do...about $88 for our example!).
So ask yourself: would I work a job for minimum wage? That runs between $5.15/hour in Georgia to $9.50 in Washington, DC, with some cities even higher. In this state (FL) it's $7.93.
Or maybe how much do you pay a babysitter? Probably $10/ hour. How about house cleaning? Angie's List says that averages $25--35 per hour.
Even a "beginner quilter" is not unskilled labor... how easy is it to find "someone who will make a quilt for you"? (see The BUYER below!)
So the minimum cost of labor would be a cheap $100 for that 4 hour job...but you certainly have more than 20 hours put in, a value of $500 at $25/hr. But even at $10 it's $250.
This is why quilts are truly PRICELESS.
So if you are selling, don't just give it away.

FORMULAS for PRICING
Yes, at this point we are quite confused. Too many variables! So let's fall back on a simple formula that has been used with some success:
Cost of materials x 3
That's 1 for the materials, 1 for your labor, and 1 for everything else, which includes your PROFIT...something we haven't even begun to discuss!
Some people will say "x 2" but that means you have left one of those things out...no doubt your profit.
Now for the example quilt (fairly easy and not a lot of quilting) we are talking about a price of $357.
One of the best work-arounds I found was a lady who charges $350 to make the quilt, and the buyer goes shopping with her for the materials, and pays for them! 

THE BUYER
And now we come to the other side of this issue. 
Most reasonable people will talk about "fair market value", which means " the amount a willing buyer may pay a willing seller assuming they both have equal knowledge of the item".
Those are my italics, because here's the Big Problem: the buyers do not have equal knowledge. Oh, they are sure they would never be able to make a quilt themselves! But they are also bombarded with  stores selling King Size Heirloom Quilts for $35! Or maybe they have ordered a quilt from a better store online and paid as much as $300... for the very same King Size Heirloom Quilt! The ads love to say "heirloom" but unless you are the grandchild of someone in a Chinese labor camp or a sweatshop in India, these are not your heirlooms. What they are is imported quilts that are made with cheap materials by cheap labor...how much do you think a person is being paid for all their work when an item is selling for $35?
Now that very inexpensive bed-covering may be exactly what somebody wants, especially if they don't mind replacing it in just a few years and never, ever being able to clean it.
But the quilt you made will last a long time and will probably survive cleaning, even in a washing machine.
The kids might "use it up" over time, but chances are also good that the quilt can be passed down through many years...and that would make it an heirloom!

SETTING A PRICE
You may have been asked to make a quilt and received a shocked reaction when you just started by saying how much the fabric would cost. You may have tried to sell a quilt and been told the price was "TOO HIGH!" 
The example quilt here was for sale last year...and remained unsold at a price of $125. It may be that nobody liked it. It may be that the other same-size quilts for sale were being "given away" for $70. Maybe those quilters were happy to get $70 and don't care about all the rest. Some quilts are priced low because "that's what they go for around here".
Everyone has a right to ask what they want for their quilt, but...
We have to help the buyers understand what they are getting. Even if you sell for a bargain price, they need to know what an incredible deal they are getting. 
Our work will never be valued even near the proper amount of we fall into the trap of believing buyers who think it's the same as the "store bought" ones.
Your quilt is made with better quality materials, with colors and patterns carefully chosen by someone who was personally invested in the making. It is not a mass-produce item.
If someone is offended because the price is too high, then maybe they just can't afford it, or they are unwilling to pay. It is not because you are wrong. 

A HANDMADE QUILT
You bet your quilt is a handmade quilt...even if you used a sewing machine! Handmade that means made with the hands, and that the hand of the maker is evident in the item. Your hands are used for cutting and are on that quilt through every step. It is not a factory product.
I have never been able to set a stack of fabric beside my sewing machine and come back later to find a finished quilt.
It may not be hand- quilted (which actually would put premium on the price), but you have put an awful lot of handwork into the process! Even if it's been long-arm quilted (which is another entire skill set...for another post!). 
Plenty of handmade furniture has been produced with power tools, and a home-baked pie still requires an oven.

BOTTOM LINE
When you sell a quilt, tell about all that went into it. The person who's buying it is getting something special...it is the only one there is!...and they need to understand that, even if you ask only a fraction of it's worth.

There are so many other issues connected with this topic, I hope you leave some comments so we can talk some more! 


Sunday, August 3, 2014

Value vs Color

What would you do with a luscious collection of 20 Jinny Beyer batik fat quarters?
I mean actually DO, after much petting, arranging, and showing off?
I'm thinking of cutting squares, and inserting strips of the opposite value into each one.
So, as a prelude to cutting into them, I decided to sort the collection into two values: Lighter and Darker. 
Then each pile was sorted to run from the lightest to the darkest.
I thought I was doing pretty well until I got out the red plastic thing to look through...and found I did not have a nice smooth transition of values. 

If you've done this, you know who the trouble-makers are: the brights and the reds! I know there is a green plastic thing to look at the reds, but I don't have one. Heck, I had to do some serious rooting around just to find the red thingie! Usually I just depend on my extremely poor vision, and take off my glasses to squint at a set of fabrics.
I made a few adjustments and came up with these sets. On the right is LIGHTEST at the top and on the left is DARKEST at the top.
Light to dark                                  Dark to light

See how that bright turquoise sticks out? But that's where the red plastic "said" to put it!
Then I remembered my little camera has a setting called "COPY", which really means it changes things to black & white...just values, no colors at all. 
Now I could really see something...like this:
Lights                                      Darks
So my camera agreed that the bright turquoise should be moved up to the lighter fabrics.
But take a look at the bottom fabric on each side...they are exactly the same! Which is how running the values in opposite directions on each stack should come out. A quick glace at the first pic, with the colors, sure does have those 2 looking different! Maybe they are in the wrong stacks?

So I just moved a few pieces around, checking with the camera. Sometimes I even had to put my finger on the piece to be moved, as I looked through the lens. When the color is gone, these guys all look alike!

Here's the new arrangement:
Lights                         Darks
Now that's what I call a nice smooth transition!
So what happens when the color comes back in?

Lights                                    Darks
No wonder everybody gets confused by this stuff!
But that still doesn't mean it is not important. You have to take it like all the other "rules"...don't be set by them, just be guided.

This was a very helpful exercise. 
When I start to cut and sew, I'll take the very lightest one (top left) and put it with the dark that is least dark (bottom right). That will make for a good contrast between each pair.
And If I don't like any two together...I'll change them!
                                                                 
I'd like to say a Big Thank You again to Connie at Stepping Stones in St. Simons Island, GA for sending me these fabulous fabrics...as a thank you for designing her Row by Row Experience pattern....
and leave you with an old Scottish proverb:
When the lights are out, all cats be gray!
The cat is always gray at my house!


Tuesday, July 22, 2014

Row By Row Sailboats

Row--row---row your boat! Row made by Connie Vagtborg

I was so excited when I got a call from Connie at Stepping Stones Quilts back in May.
They are part of the nation-wide (and Canada, too!) Row By Row Experience quilt shop hop this Summer. This year's theme is Seasons, and each shop has a free pattern for a row celebrating a season they love. Sailboats for Summer was a great choice for St. Simon's Island, GA!

Connie's idea of the Sailboat block was perfect...who needs to do a hard block during the lazy days of Summer? But I was familiar with both this block and Row Quilts, not to mention quilters in general! I knew there were few things to consider:

Sizes have to be numbers that are actually on your ruler! I don't like to use anything too small to find. Those tiny measurements can be left to the woodworkers. Many quilters are married to woodworkers, don't you know. They also like to cut things up and put them back together in a new way!

Row quilts are so much fun, but the rows may touch each other. I thought it would be good for the Sailboats to have a little space of sky above their sails. That makes it much easier to sew without losing the triangle points! Plus, you don't have to add a sashing strip to divide it from another row.

Quilters like options! Somebody always has a "what if..." idea, and I say try it! So I added a simple block I called Open Sea, which is just the sky and water. It could separate the sailboats, and provide another area for embellishments.

Embellishments...oh, my...there is nothing like a simple block to get the creative juices flowing! I won't spoil your fun with any suggestions...though there may be a few on the pattern page, and certainly visiting Stepping Stones will inspire you.

If you like to shop hop, check out the Row By Row Experience. It runs July 1 to September 2. Especially if you're travelling around this Summer, you'll want to see the list of shops where you'll be.
And you haven't been to St. Simon's Island, go now! It's a beautiful place to visit with lots of historical sites...as well as one of my favorite quilt shops!

ADDITIONAL NOTE:  I neglected to publish this post a few weeks ago, but lots of the Row By Row quilts are showing up on Facebook and in other places! Everyone seems to be having loads of fun with the project, competing to be the first one to finish a top and take it one of the sponsoring shops. There have been a lot of creative interpretations of the rows, too!