Saturday, September 12, 2009

Quilt Show Countdown: Take-In Day

The quilts have been collected!
At five locations around the area, groups of volunteers worked for 4 hours to check in all the quilts entered in the show. More than 480 were expected!

Besides ones that were delivered from local quilters, there was a huge number of quilts that were mailed in. Those all go to one address, and are then divided up and given to volunteers who take care of the quilts as though they were their own: they open the box, remove the quilt and examine it for any problems, then bring it to a Take -In location. When the show is over, they gather their charges and mail them back to the owners.

Every quilt, delivered personally or mailed in, have to go through the same take-in procedure. One by one, the quilts are carefully opened up and spread out on a sheet-covered table.
Measurements are taken to be sure the quilt is entered in the correct category (and sometimes they're moved!) and to see that it is clean (lint rollers are part of the Take-In supply kits) and make note of any stains or damage.
Critical is having the top of the hanging sleeve at 90" from the bottom of the quilt. That means on very large ones the top edge is folded back over the hanging rod, but it allows the bottom edge of the quilt to NOT TOUCH THE FLOOR.
Can you guess that is really important? It is, because if the quilt touches the floor it can be soiled or damaged. In past years we would pin the bottom up...but that was a terrible job, and no one felt right putting that many pins into somebody's quilt.
This year some quilts had to be returned because the sleeve was not 90" from the bottom. If the owner could move the sleeve before Take-In was over, then it was accepted. Other wise...I guess they have a start for next year's entry!
(and for those wondering, this is clearly stated on the entry form, complete with a diagram!).

Plenty of hands make handling the quilt a smooth process as the front and back are examined, then carefully re-folded and put back in the cloth bag it came in.
The owner gets a receipt for proper pick-up at the show's end, and the quilt's bag has a big tag attached so it can quicly be identified by it's number.

The number tells the quilt's category, and they are all stacked in order until it's time to be loaded in vans and delivered to the judging location.

This picture was snapped early in the day! By the time all the quilts came in, this entire area was covered.

Pictures I didn't take:
1) the entire pile of quilts!
2) my van and one other crammed full of quilts
3) the quilts piled up on rolling carts at the hotel ...
4) and the quilts being sorted by category in the large room where judging will start tomorrow!

All the quilts assigned to our location came in except one.

And there is always somebody (for once, not me!) who needs every single minute up to The Bitter End to get her quilt binding finished!

No names, please! This could be any of us...one finishing the binding, one moving the sleeve.

I salute you valiant quilters, stitching on until the job is done so your beautiful creation can be part of the show!

Judging starts tomorrow at 7:30 am.
I'll be there...all 3 days. But I am not allowed to report anything about what is said, or what quilts get prizes, or basically anything.
I will try to get a picture or two, but it won't be easy to take a photo that "doesn't show anything". And I'll tell you about the process, even if I can't reveal any info about the quilts themselves...
you will have to make it to
QuiltFest Sept. 24--6 at the Prime Osborn Convention Center, Jacksonville, FL!
Or keep visiting this blog (and here's a big "shout out" to my fabulous readers around the world! Hope you enjoy this peek behind the scenes!)

Friday, September 11, 2009

Quilt Show Countdown: Take-In Eve

It's time for the 2009 Quilt Show Countdown!
Only 13 days until QuiltFest in Jacksonville, FL, and there are many things to do (not counting all the months of work the Board members have put in since the show last year!).
Tomorrow is Take-In, when local quilters bring their creations to one of several locations around the area. Mail-in quilts have already been received and assigned to volunteers who will care for them through the show.

There's no minute like the Last Minute! It's been tha Last Minute for a couple days around here, but I am happy to say I am ready to go for tomorrow morning!
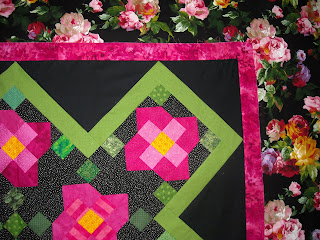
I did have time to do a mediocre job of quilting down the pink border on Roxanne's Honeymoon.
The border is 2" wide, so I marked every 2 " with my handy chalk marker. Using 3 marks, I started at one side mark , curved up to the next mark on the other side, then aimed backed down to the third mark to stitch an arc shape.
(note use of the term "aimned"...I was in a hurry and doing this by eyeball...'nuff said!).
The arc continued from one end of the border to the other. Then I went back and started on the opposite side, but making the same arcs using 3 marks. This ultimatley creates a design called "Egg & Dart", an oval and a diamond alternating along the border.
I will say this: it does improve on the un-quilted look the border had, and since the thread matches the fabric perfectly, the quilting design is not too noticable.


That was it for Roxanne's...I already had the binding, sleeve and label on!
So on to The Black T-Shirt Quilt.
I kept hoping I could just leave it alone, yet it still wanted more quilting.
Today I did free-motion quilting all through the various sized sashings, and they are improved by having some stitching in them.
This quilt may have the perfect backing fabric:
It didn't matter if I used red or black, top or bottom, it all desappeared into this busy print!

That was fine until I had to go look for the thread ends to snip.
You can see here a clip-on reading light, which I needed to find the thread, and a great pair of little scissors. They have curved handlesso I can keep my hand above the quilt, and then the ends curve back up, too, so they are not as likely to poke through the fabric.

At last, two quilts bagged and ready to go!

The one on the right is going in a pillowcase I have especially for show entries. I took a big Sharpie pen and wrote my name, address and phone number really big on each side. The fabric is red & white striped, so it's easy to pick out of a pile.
The one on the left is going in a humongous bag I sewed for toting quilts...first, it is rather ugly, so nobody would want to take it. Secondly, and most important, it is HUGE.

Friends, do not send your quilts to a show stuffed into a bag like a sausage!
I know tomorrow at Take-In we will see some that are so tight inside their bag that it's a struggle to get them out. The after we check the measurements, paperwork, and show requirements (such as the sleeve being 90" from the bottom of the quilt), it is extremely hard to get that quilt back into the bag! It really puts un-needed stress on the quilt.

And consider this: by the time a quilt is checked in, judged, hung at the show and then taken down so you can have it back, it has been in and out of that bag 4--5 times!
Be kind to your quilt AND the show volunteers....use a bag that holds the quilt comfortably!


We have 4 hours to check 71 quilts at the Take-In where I'll be working. It will be busy, hard work, and lots of fun!
I'll try to get some pictures for you to take a peek behind the scenes.
After we're done, the quilts will be loaded into 2 vehicles (yes, the QuiltMobile is one!) and delivered to the hotel where the judging will be done over the following 3 days.
Stay tuned for more Quilt Show Countdown!

Meanwhile....
several people have been asking about Shayla O'Puss and her adjustment from living in a shelter to living in a house.
I am happy to report, she has settled in quite well,and is friendly to my husband and other people, if they are sitting down (she's still suspicious of anyone on their feet!).
She's pretty well taken over the whole house, and enjoys her roles as Office Cat and Studio Cat.
But first and foremost, she is....

A QUILT CAT!

Monday, September 7, 2009

The Black T-Shirt Quilt returns!

When we last checked in with The Black T-Shirt Quilt, it was barely getting to be a top. See it by looking back here in June.

Meanwhile, good friends Rita and Cherry-Cherry helped me baste it....and a nasty job it was, with a "vintage" polyester so-called black batt. That means it was hiding in my closet for many years, and it's really a charcoal color.But what's going on here? Yes, once again I got the backing too short, and have to add on a section.
In my can't-wait fashion, I went ahead and did all the in-the-ditch stabilizing quilting, working my way up and down from the center out to the sides. Then I had to peel everything apart along one end and add the extra strip of fabric.


No, I was not smart enough to trim the selvedge off first. It's just going to be part of this quilt forever!
The worst thing, though, was having to touch that batting constantly. Yech!
Or maybe the worst part was having to press open a seam 63" long, trying not to hit the batting with the hot iron!
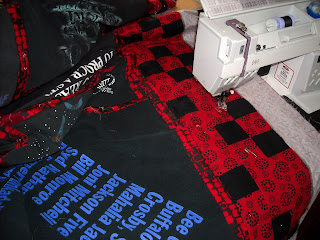
This is the price I pay for being me. Yet somehow, it seems to work.


Next came quilting inside the blocks to keep the whole thing from looking like a giant puffy naan (that's a bread from India...if you've eaten one, you know what I mean!).
Mostly I did a wavy sort of line, generally following the shape of the words or pictures.
A wavy line is never expected to look straight, so it saves you from a lot of heartbreak and irritation!


It was really miserable quilting on the knit fabric, even though all the shirts had been stabilized with a woven interfacing. Very hard to avoid pleats & puckers.
And that poly bat!!!
It's been years since I quilted with one, and honestly I am glad I did this one.
It reminded me why cottons and blends are a thousand times better!

Poly is slippery and stretchy...and springs back to where it stretched from. Not fun at all. (though it doesn't need to be washed to be puffy...it does have it's place in the world....just not MY world!).

Finally time to quilt the border!
It's my design called "Cheating at Checkers", so I continued with the "cheating" theme and did the corner-to-corner curves in each black square, free-motion by eye.
Then I went back with red thread and did one long diagonal line through the red parts, as though it would be going through red squares, if they were there.
I bet when I really look at it, it will seem like I only did half of Xs through those red areas.


My goal this year is to get two "Needs More Quilting" remarks from the judge, and I believe I am right on track with both entries!


One of my favorites shirts! It got some nice spirally sort of lines to show off Our Home Galaxy.

The binding is sewn to the front now, and it needs stitching down on the back. Then a sleeve and label. Oh, I hope to get some random quilting done in the red sashing, too.
And there's still a pink border on the other quilt that I'd like to stitch down.
Even if I have time for those two things, I will still be able to reach my goal for the judge's remarks!
Only four days until Turn-In!

Meanwhile, here is attempt #3 at having a phone in my studio:

And do note that you can actually see a space on my floor!!!
The last phone made a continuous sound like a squirrel. It had to go!

So if you call me, and I'm sewing, now I don't have to run out the door, down the hall and into my office, hoping to grab the phone before the answering machine comes on!

Tuesday, September 1, 2009

Quilting Black-on-Black, Part II

After trying several ways of marking...or not marking...on black fabric, I bought White Marking Pen from Clover (is there a fat one???). It is like a ballpoint pen.
There are many warnings to read the instructions before using, but not much new...four statements: one a sales pitch, one CAUTION (try it first, of course), one about how it works, and one about how to get it out.
The strange thing with this product is the "ink" goes on clear and then turns a fairly visible white. So if you were drawing free-hand, that could be a problem.....the same problem I was having with free-motion stitching black thread on black fabric!
Here's a sample of how it looks as a line, and then I scribbled a LOT on, to see if it would come out:


This is about as in-focus as I can make my own eyes right now!
The way to get the mark off is by washing or ironing, and I am pleased to say both worked on my sample scrap. So I marked right on my quilt:

When you need a template, there's no place like the kitchen! My dinner plates are immortalized in many quilts. This is a melemine plate from the dollar store!
I decided to stay with the process of marking out large areas/ shapes, and then filling those in by eye.

A very nice cresent Moon, though my eyesight for making even lines is laughable.
Still, at this point, it is 10 days until the quilt show Turn-In, and I still have another basted quilt waiting!


It seems counter-intuitive to IRON on your quilt, but I did it just to see how the lines would come out.
They came out...it flattened the area. But I usually give the quilt a ride in the drier for a bit to freshen & fluff before it goes anywhere.

When I am pushing & shoving & rearranging a big quilt through my machine, I remind myself that it's that process making the quilt soft. It is very much softer and nice after the quilting is done (unless you have stippled it within an inch of its life and stiffened up the whole thing).
Washing has the same effect, and I have been doing that more often, but this one I don't want to wash before the show...mainly a time constraint.
I might change my mind, though, as the washing and drying gives it the puffiness we like to see (and fills in the little odd spots we hope the judge will miss!)

Why do we also like the flatness when a quilt is just done? We think we are able to appriciate all that quilting we just finished! But 9 times out of 10, the puffiness is more pleasing.

I did continue on and quilt all the flower blocks with a totally free-stitched bumpy flower petal effect.
At least, I hope that's the effect! It's definitely bumpy.
It was nice to just be quilting pink thread top & bottom, knowing there would be no odd color thread showing on each side.
I stopped worrying about on the back...I am sure the judge will mention it. She will be correct to do so, but I would be highly suprized to read a comment that says anything I don't already know about this quilt!

Except for a black thread glob here and there, the back looks pretty good.

So, here I am down to the wire, and the thing is that the quilt still needs more quilting!
Some quilts are demanding that way. This one has been like that from the beginning, which is how it got as much as it has now! But it doesn't really have any quilting in the black background around the blocks, and it should.

I determined that I can add the sleeve without any trouble, so that's going on next. Maybe (ha, ha) if I have time, I'll go back and try to do some more quilting (who AM I kidding???).
But for now, this will have to do.

My belief is that quilters, once they are beyond beginner level, do about the best they can at any given time. Anything that is not quite right is because they decided not to do it originally, or didn't go back and fix it.
I know the right way to do almost everything, but I seriously lack the patience to perform like a champion quilter. And that, of course, IS the difference.

Those Big Award Winners don't necessarily know more than others, but they buckle down and don't let anything get get past them but their 100% best work...and so they deserve all the awards they get.
Meanwhile, as always, I am off to my next project!

Friday, August 28, 2009

Seaside Piecemakers Mystery is solved!

I had a wonderful time in Satellite Beach with the Seaside Piecemakers!
This guild is 300 members strong. Visit them at their website http://www.seasidepiecemakers.com/ to learn all about their many charity and other activities.
They have a quilt show next year on March 12 & 13...and don't miss their fabulous opportunity quilt!

The day started with "Taming the Scrap Basket", and I am happy to say nobody passed out when I revealed the quilt top I have to keep hidden in a bag during the lecture. Not all scrap quilts are pretty!
After lunch, we started into the Mystery Quilt I designed with a seaside theme and named "Shining Sea".

Here it is at home on my design wall...a block for the sky, a block for the sea and another for the beach. The sun is paper-pieced with strips.
But wait!
There's more!
This is the most unusual quilt I have ever designed for a Mystery Quilt class, because it has TWO SIDES!
Here is the other side....

These are planned to be opposite sides of the quilt and with careful basting are quilted together (these photos are the unquilted tops, though).

Originally this was designed as a huge quilt with the Sun on one end and the Moon on the other, then dropped down to a baby quilt size, then ended up 2-sided. WHEW!
The class included very brave quilters from beginners to experienced, and they worked hard to make the blocks without having any idea at all what they were making!
In the end, all came out fine, and I am looking forward to seeing some completed quilts.

I especially liked all the ideas they had for making their own creative choices...one will be made a bit smaller and done as two separate pieces, others were planning some wonderful applique additions.

This one definitely wants to be a pattern, which will also have the large one-side quilt design directions.

I should have had more pictures, but instead of being in my purse, the camera was riding around in my husband's car! It was hiding in the glove compartment, where I had to stash it before going into the Crosby, Stills & Nash concert last week.
Darn...no concert pics and no class pics, either!
I suppose this is why there are cameras in cell phones. Except mine.


But don't worry....the camera is back by my side, and ready to take you through the Big Quilt Show (QuiltFest) again this year. Things will be starting up on Sept. 12 with Take-In Day. If I'm careful, I may be able to take some photos at judging, and of course you'll get to see set up, the show & take down!
Meanwhile....I still have two quilts to finish!

Sunday, August 23, 2009

WELSH Quilting

Thanks to the Mysterious Ms. E for correcting my error. I am being inspired by WELSH quilting designs!
What could be more embarassing than to celebrate my heritage by using the wrong name, especially when I do know the difference!
Here's my bibliography, so you can enjoy these wonderful resources, too:

Jenkins and Calridge (2005) Making Welsh Quilt: the Textile Tradition That Inspired the Amish? KP Books, Iola, WI. Nice color pictures, history, plenty of good examples with diagrams.

Rae, Janet (1987) The Quilts of the British Isles Bellow Publishing Co. Ltd., London. Don't skip the old books, they are real treasures! This one has good photos and also gives a wider history and difference among the styles.

Horton, Marjorie (1999) Welsh Quilting Patter & Design Book Self-published by Marjorie Horton, Rainier, WA. This is the best, but you'll have to search for it. Mine is bound with a plastic comb. It has wonderful digrams and shows how to draft out the whole-cloth designs that are the true Welsh quilts.

And you must visit these websites: http://www.quilt.org.uk/index.htm
http://www.welshquilts.co.uk/index.html

I am just free-handing sketching and stitching motifs. The eventual goal is to make a very traditional Welsh quilt someday.Here's the "Welsh pear" or paisley as we often know it. You can see the remnants of the chalk out line I drew. Many of the these designs are shapes that are outlined with a double line (heart, leaf, pear), then filled with smaller traditional shapes.

This is all the marking I'll do. The leaves only have a vein marked so I'd get the spacing.
I don't know how this will be filled in until I start doing it.
I did start right after this photo, but ran out of thread!

I ran out because I was going back to do a lot of filler meandering in the borders: It's Cherry-Cherry's fault, for saying an un-quilted border on someone else's quilt was "Sunnie style".
It's good to have friends to blame things on. I am sure CC has plenty to blame on me!
At any rate, this quilt will be done soon, and then it's on the The Black T-Shirt Quilt!

Thursday, August 20, 2009

Quilting Black-on-Black, Part I

Black thread on black fabric seems like a good choice at the time. Then you realize you can't see where you're going, and how-the-heck are you going to mark any lines?

There are 4 corner triangles and 12 side triangles to fill in the Roxanne's Honeymoon quilt.
This is a totally different version of a Mystery Quilt from back in January
Yes, the one that was supposed to be finished in January! (hey, it's only 8 months later...)( the top was done in January!)
It is entered in the huge "local"quilt show, so it has to be done by Sept. 12 Turn-In Day. And do stay tuned for more of my blatant insanity, as I have another unfinished entry, too!
I started in a corner with a loose meandering, and that really unravelled my brain as I decided to do fancy side fillers! Usually one goes from complex to simple...I have to be different!
I wanted Celtic designs (at this point I cannot account for my thought process, other than I have always wanted to do this) but how to get them onto that black fabric?
I couldn't just go free stitching, as the black makes it impossible to see where you've been....and don't you hate that un-quilted puff in the middle of everything after you think you are through? (you know what I mean!).

So my Big Idea was the draw the designs freehand on some special paper:
Cherry-Cherry gave me this Golden Paper, one of her favorites.

And as a helpful resource, I have some books:
I'll give you a list in Part II..there is one more!

And to hold the paper down without a lot of pins tearing at the paper as it is quilted, I thought of basting spray!
Some pins, some spray
CRITICAL TIP: just a little spritz on the corners & center! All that paper has to come off, and I have some tiny areas in these designs!
Sometimes the paper has to be adjusted as you go to keep the design inside the triangle

Large open areas are no trouble at all, but that little double line (a very important part of Celtic designs) would be tricky to get the paper out of.
I realized if I just used the paper for the main design areas, they would be broken into smaller sections.
Stitch the outline, then work in one area at a time
I could fill those in by eye, drawing with the needle according to the sketch I made.
Keep the torn off section for a reference

The main thing to remember is that you are following a line...sort of...but that line no longer exists once the paper is gone (or blue line is washed out, or chalk rubbed off, etc.). Your stitching becomes the line, and it cannot be compared to how "on or off" it is!


There are several leaf shapes in there somewhere!

So that worked out pretty well, until I got tired of scraping off all the little paper bits.
TIP: Scratch with your fingernail going the same direction as the sewing line...it won't pull against the stitches and stretch them. (OK, I know you will really pick at them any direction possible, because I did , too! But they might wash out as well.)

Now let's add insult to injury and discuss my bad choice of quilting thread.
I have a lovely salmony pink that matches the back...what was I thinking? Of course it shows up on the BLACK top!
And how many times have I said I will sacrifice the back to make the top look good? Hmmmmm????? The chickens are coming home to roost!
I am sparing you a picture, because A) it's really not that bad unless you are up close, and B) I can't take a picture that close.
I am using a very thin black thread and liking how that looks on the black fabric.

Those who know me have been asking this question: How long did you stick with your drawing & quilting on paper?
You know me so well.
It's true, after 3 paper triangles it was too much work, and I have now resorted to blocking out areas with a chalk marker!
The less you need to mark, the more freedom you have

It's easier to do the fill-in patterns free-hand after you've followed several sketched out ones. This will be a flower, the Welsh Rose, with it's big decorative leaves.

Check in soon for Part II, when I have the last of the side triangles done!
There's quite a bit more quilting to do on this, but as long as I have the black thread loaded, I'll launch into The Black T-Shirt Quilt!

With a Very Big Thank You to Cherry-Cherry & Rita who helped me baste TBTSQ this afternoon...a nasty story that will wait for another day! (Hint: "vintage" polyester "black" batting!).