Sunday, July 5, 2009

A Watermelon for George

My friend George had a stroke several weeks ago.
It's a real blessing that he is doing very well, is out of the hospital, and working hard at physical therapy so he can get back home.
I'm leaving at 0Dark:15 on Tuesday morning (yes, that is even earlier than 0Dark:30!) for the airport, and the long airplane trip out to Seattle...DH & I are headed West to see George and many other wonderful friends in the Pacific NorthWest.

Meanwhile, Pat Hagen has devoted some space on her website to run an auction to raise some money against those medical bills. To take a look at the wonderful paintings and other donations, click on George's Auction.
This is my contribution:The title is "Because It's Planted in the Spring", which is, of course, the answer to the question, why do they call it water-melon?
(we take a momentary pause here for groaning....)
The quilt is about 52" x 70", all cotton, made in the Boston Commons pattern, and in that white area there are watermelon leaves quilted in pink thread.

Like all quilts, it has A Story!

Although I made this several years ago, it has never been used, so now I am quite happy for it to go out into the world.
It's washable! I know, because I had drawn the leaves on with a blue washout pen, and finished quilting it at noon on the day it was to be turned in for QuiltFest by 3 PM.
I thought I was going to just wipe off the marker and be done...oh, no such luck. I had to really soak all around that quilt to get the blue marks off.
By then it was sopping wet, so it went into the drier...and it was actually delivered at Check-in still toasty warm!

Imagine my distress when I was gliding through the show on my way home after helping to hang the quilts. There was my Watermelon...looking like it was waving in the wind!
I'm not a perfectionist about quilts, but I do have students who are looking for whatever I have in the show each year. Most important, I know how to make borders so the quilt hangs fairly straight.
What had gone wrong???

Finally, in the middle of the night, I realized the large white section had been so wet, the cotton batting shrank when I put it in the drier....but the rest of the quilt had never been wet, so it did not shrink!
I felt better, having solved the mystery, even though the waviness was still a tad bit irritating!

Now you may be wondering how I decided to make a watermelon quilt in the first place.
This was actually made as a class sample back when I was teaching Quilt In A Day at a Big Box Store. I always make a sample, no matter how easy the pattern is, but after awhile I could no longer make a nice regular quilt every time.
When I saw the Boston Commons design, I just flashed on the new watermelon fabrics that had recently come into a real quilt shop, and there was no turning back!

The next time you need to make something traditional or quick or in that vein, go with it...the sewing will be easy.
But get some really great colors, or use some crazy "conversation" prints. Your project will be more fun in the end!

Thursday, July 2, 2009

Cheating At Checkers

Here's my latest crazy idea for a border...I call it "Cheating at Checkers".

The Black T-Shirt Quilt needed to be a bit wider, but not much longer, so I wanted a design that would add to the sides, yet be narrower at the top & bottom.
I decided on a Checkerboard using 2" units, equalling 6" on each side of the quilt, but only 2" on each end. The squares would coordinate all the way around that way.

The traditional way to make a Checkerboard is to make 9-patch blocks, some with the X format (darks in the center & corners) and some in the O format (dark in the center of each side), and alternate them.

But I just couldn't leave well enough alone!

I thought I'd make an irregular checkerboard, so the squares would be randomly floating!
(no, I do not know where these ideas come from...or, even worse, why I go ahead and make them! But I do!).

Being simple-minded at math, I just divided the block into it's basic lengths: 2", 4" and 6".
Then I cut strips those widths from the "background" fabric (red) and cut 2" strips of black for the squares:


Each width got a strip of black sewn along the length, then I sliced them all up into 2" sections.

It does not matter that they are different lengths. The way I made the border was to randomly sew these sections together to make one long strip the same length as a side (80" long).


Then I sewed another strip the same length, and started sewing it onto the first strip.
Whenever I got 2 black squares together, I ripped a section out, sewed the ends back together, and kept going.
I had to add a bit at the end of the second long strip, since I had removed sections in several places.

The whole point here is to be random...the only thing I cared about was not having 2 black squares together (side by side).
To complete the "9-Patch" look, I sewed another long strip, and added it to the first 2...again, ripping it out if there were 2 black squares together.

This is how it comes out:

There were even a few actual 9-patches that showed up, by they weren't planned and I just left them in!
I especially like the places where one lone square is floating.
You'll get a better look at the whole thing after I've quilted it...I was a bit nervous about stretching the borders while getting a photo.

But I couldn't wait to share "Cheating At Checkers" with you!

Monday, June 22, 2009

The Black T-Shirt Quilt...almost!

This quilt has been about 12 years in the making....
meaning I've waited that long to start getting my hands on the black T-shirts!
When my son finally gave them to me last year, he said he did NOT want me to make this quilt...but I did use some to make a shower curtain he wanted.
Here is the start of the quilt with the remaining shirts:

I have been teaching a T-Shirt Quilt class for many years, so naturally the first thing I did was throw all the guidelines out the window and leap into the project.
Obviously, no good could come of that.
There is nothing worse than thinking you are out smarting yourself!

I chose the four shirts for the corners and one for the center , and then just plunged in without laying them out to see what I really had to work with.
I ended up one shirt short, and to try to fix that I eventually ended up taking rows apart (Oh, no! Reverse sewing!) and rebuilding them.
But did I ever go back and fix the original mistake, the "not laying out" part?
Of couse not, I just kept building the rows as they came along, but narrower.

This is actually the center portion of the quilt. I don't like a T-shirt Quilt that looks like rows of blocks, and it's more fun to have them off-set.....you don't have to sacrifice any of the art work, even the small parts from an arm.
(I do the meaning of all the shirts...does anybody else out there know what the ZERO shirt refers to?)

The quilt has ended up being really long and narrow (something like 49" x 80")....so far!

Well, I have a plan for making it a tad bit wider, and other than that...I am just not going to do any more worrying about it!

IMPORTANT RULE: Quilts are whatever size they turn out to be. They don't have to be some particular size.
If you want something to be a particular size, I'd suggest designing it from the outside in...otherwise, just let your quilts be the size they end up!

The local quilt shop is having a great end-of-the -month 25% off sale, so I'll be in there tomorrow to get some more red & black fabrics to finish up the borders. Then I will know the real final size and can fill out the entry form for QuiltFest in September! I wish they had a prize for quilts that follow the theme...this year is "Recycling the Past"!
And for those readers who are quite astute at forseeing trouble ahead...yes indeed, I am facing another giant quilting project of black-on-black!

Still, I am looking forward to this year's entry in my personal series of "quilts intended to make people laugh".
And if there's time, Cherry-Cherry & I are planning another one!

Meanwhile, I have designed and sewn a very different sort of Mystery Quilt for the Seaside Piecemakers in Satellite Beach. It turned out so big, I decided to make it a two-sided quilt...so if anyone from down that way is reading this, the description says it's reversible, but it is NOT that quilt-as-you-go, batting-buddy, square-by-square turn-the-back-to-the-front style that's going around the state right now!
More on that later.

A note for Shayla's fans:

She's doing a great job of learning to be a housecat, and now spends as much time on top of the futon as behind it. She has not been behind the bathtub for a long time, since she discovered my studio and office.
We both really like that Jane Sassaman fabric, which is really the back of that quilt. The front is a 9-patch, but I quilted it from the back to follow the fern shapes.

Thursday, June 18, 2009

Catch up time: Gee's Bend & SSQA & more

I've been busy (who hasn't?) and just want to take a minute to catch up!
We had the last official event with the Gee's Bend Quilts (they will be here until August 2). Can you imagine listening to a fine choir while sitting around the quilt frame? This is the second group we had the pleasure to hear, both came from the LaVilla/Ritz area local school, a magnet school for studying the arts.

Another Big Project has been assisting in the re-design of the Sunshine State Quilters Association website.
After ten+ years, it needed a new fresh look, new organization, and a whole lot of re-writing.
You may know how it is, when you care about something being done "right"...I couldn't let the shiny new look go out in public with the same old content! And many pages that had been ignored for years would now be re-examined!
Is this my job? No. But I made it my job, so who do I have to blame?
That's right...the same old one always put her foots in it!
There was a ton of updating and creating...and I hope it compliments the bright and exciting new look of the whole site!
Visit and let me know what you think! http://www.ssqa.org
This is not my solo effort by any means! At this point I give a huge Shout Out to Pat the Webmaster, who did all the heavy lifting with arranging the pages & HTML coding & figuring out colors & all that computer magic that is beyond my ken. There was nothing I wondered about that Pat could not find a way to do!

Of course, there was some quilting going on, too...
Just so you know, the Black T-shirt Quilt is in process! More on that later.


Also in the works is another Mystery Quilt, this one for Seaside Piecemakers in Satellite Beach, FL.
It is not like any other Mystery Quilt I have designed! The design is unique, and I always offer two sizes...so besides the traditional large lap size, the smaller size can be a two-sided baby quilt!
You'll have to wait until August for the Big Reveal on that one.

Monday, May 25, 2009

Quilts of Gee's Bend & a Double Wedding Ring

The Quilts of Gee's Bend are on display here in Jacksonville, FL, at The Cummer Museum of Art & Gardens until August 2.
This is one of the largest survey collections shown... there is a different grouping of the quilts each time a museum or group sponsors the exhibit.
My guild was invited to do a demo for the two Members' Openings (Sunday evening and Monday afternoon) and again on Family Night (June 2) when there will be 700+ people coming through the museum!

Here are a few of us around the frame:

When I took this picture, I was warned not to be taking any photos of the quilts...so I didn't. But I can't help it if a few sneaked into the shot!

What a treat to be located right in the center of the gallery amidst all those quilts!
Of course, it is museum gallery lighting, not intended for doing handwork. We were there to talk with people, though, not actually accomplish anything.

Some of the quilters brought their own hand project, as they did not want to quit on a frame!


One of the most-asked questions was "When will this quilt be finished?"
The answer: probably never.
It's purpose is to be on the frame all the time, so whenever a demo is needed, all I do is carry it in (the legs come off the frame so it is totally portable).

Anybody who wants to stitch on it is welcome, and it has been worked on by people of all ages, from many walks of life, male and female.

Even non-quilters recognize it as a Double Wedding Ring.
It is a very fine 1930's vintage top that was given to me by Vergie Greene when she closed up her house to move to a nursing home. I found a backing that is appropriate to the fabrics and basted it, then loaded it into the frame about 18 years ago.
Except for a brief time when I took it off, thinking I could just go ahead and finish it, because no one had called for a demo in a long time, suddenly it was needed! I put it back on the frame and there it has stayed, ready to come out and "go quilting" whenever wanted.

For all you Double Wedding Ring fans out there, I'd like to point out a few things about this quilt.
1) Note that the fabrics really are different from the reproduction prints sold as "30's fabrics". They are true scraps, and it's fun to see the parts of different ones all over the top!
2) The pink and Nile green four-patch sections are about as classic 30's colors as you can find!
3) Those same sections are a kite shaped or curved diamond, and that allows the rings to be perfect circles. Sometimes this is made with a regular 4-patch where the rings come together, and that makes them flatten out, like a square with curved sides. The beautiful round rings were considered a sign of "better" workmanship.
A funny thing about this top is that most of it is handstitched, but some was done by machine!

If you have an old quilt top in good condition, and it's not a very old antique or some way associated with a historic person or event, then it may be a good idea to quilt it. A finished quilt is usually better cared for than a top, especially when you are no longer around to enjoy it!
If you have the quilting done on a long arm machine, be sure to research the kind of quilting that would have been done in the top's time, and plan for a design that respects the original stitcher.

Sunday, May 24, 2009

Artful Bras raise money & laughter!

When BRAS was announced as the guild's annual challenge this year, there were some raised eyebrows! There were some mumbled comments along the lines of, "Oh, my Lord!"
The Board wanted to make sure that QUILTING had to be obvious in the finished projects.
Then there was a torrent of hilarious jokes and puns....
and we were off and running!
The ultimate goal was to have a good time and raise some money for a local charity that helps women who are dealing with breast cancer.
When the bras were shown this month, each one truly was a work of art. I am sorry not to have a photo of each one...but time is tight when you're the guild Prez!

"Making Mountains Out of Molehills"

Each one had a thoughtful title on a decorative card, and was displayed on a padded hanger.
They ranged in inspirations from "Proud of Those Puppies", with brown fur faces, through "Flat As A Pancake", featuring fabric forks as the straps.
Votes were made with $1 bills, so you could be quite generous with the appreciation and spread your votes around!
Over $175 was raised for the Donna Hicken Foundation.

Here's the #1 Viewers' Choice:


If you'd like to see more Art Bras, I suggest you just do a search on Google for "art quilt bras" and you will find several projects in different states.
I'm not sure what will happen to this collection, but we are hoping to have a special exhibit at QuiltFest this September.


Personal note:
Sorry to be so far behind in my posts...I have been writing new content for the state-wide guild's newly re-designed website! It's looking good, and I will let you know when it finally goes "live". Meanwhile all the regular pages are still running for now, in case you need the plan your trip to the Sunshine State.
Shayla fans will be glad to hear that she is getting braver every day, though she is still a shy. Her favorite toy is the peacock feather she was given at her well-kitty visit to the vet.
She has not been behind the bathtube in a long time!

Tuesday, May 12, 2009

Scrapping in St. Augustine

Today the Scrap Basket went to visit the St. Augustine Piecemakers, and we had a wonderful time!
This guild has been sponsoring great classes, turning out charity quilts and holding small local displays for many years. They have a good mix of year-round residents and "snowbirds", and several award winning quilters in the membership. I am dieing to see their raffle quilt for this year, but it was out being quilted! (imagine!) I hear it has appliqued birds and butterflies.
Instead of a website, the Piecemakers have a Yahoo group (many guilds are doing that now) so I can't give you a link to peek in on the wonderful quilts they make!
But just wait until
QuiltFest this Fall...I'll have pictures then!


Every time I set it up, the quilts, etc. for the lecture look different.
But this time, Perky Old Men is front & center on the new rack my husband made. It was almost a waste to put one quilt on it....I think I should have had several folded on the rungs, and the whole rack on top of the table. Then I could pull off the ones I wanted to talk about.

The Piecemakers were the first to be exposed to.... er, I mean, the first to see the Polyester Quilt Top Found in a Bag Of Fabric!

Don't be afraid....I do NOT have a photo of it here. If I do write about it in the future, I will warn you!
I could have used this display as a photo op, but I had to keep the top hidden inside a bag until it was time to reveal....I might have lost the whole audience if they'd had a look at it too soon!
And it's very large. I was suprized when VZ jumped up off the front row to help me hold it up....frankly, I think most people there would have been appalled to touch it!


In other local quilt news, the Quilts of Gee's Bend are on exhibit at an art museum, and my guild was invited to show some hand quilting on a frame.
I'll be telling you all about that tomorrow!
______________________________________________

Meanwhile, back at the ranch.....

Shayla continues to get braver and take over more of the house.
For all her fans (gosh, she'll be ending up with her own blog soon!), here is Shayla, now guarding my office supplies:
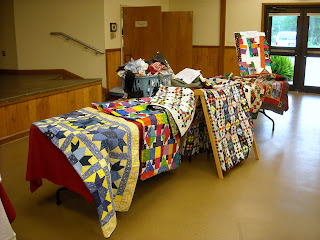
Nobody's getting inside that box!