Showing posts with label charity quilts. Show all posts

Friday, February 11, 2011

Return of the Fleece Quilt

When we last met here, I was telling about making a quilt with one layer of fleece that works as both batt and backing. This is an ideal combination for any charity quilts or other utility quilts.
It's also possible to use basting spray, which certainly speeds up the quilting process.
And, of course, a supervisor is necessary for any project. Shayla is taking her Studio Cat duties seriously.

It can be difficult to decide how to quilt something, even a small basic item.
That's because there is no one right way to quilt anything!
Having quite a few 9-Patch related quilt tops, I figured out something I call Alternate Diagonals (not very catchy...) which, no doubt, as been thought up by hundreds of other quilters. It's all long lines, so you can leave to feed dogs up and let the machine make nice even stitches.

The darker blue sashing is the same width as the squares, so it is included in the plan. The border is too wide.
Just start at one corner and quilt a long line down through the squares, eye-balling from corner to corner.
Go back to the place you started, and skip over one square.
See the pink pin head? That's where you start the next line, and into the blue square. Skip the white one.
These pictures look straight on, but really you will be feeding the quilt into the machine with the whole thing at a diagonal.
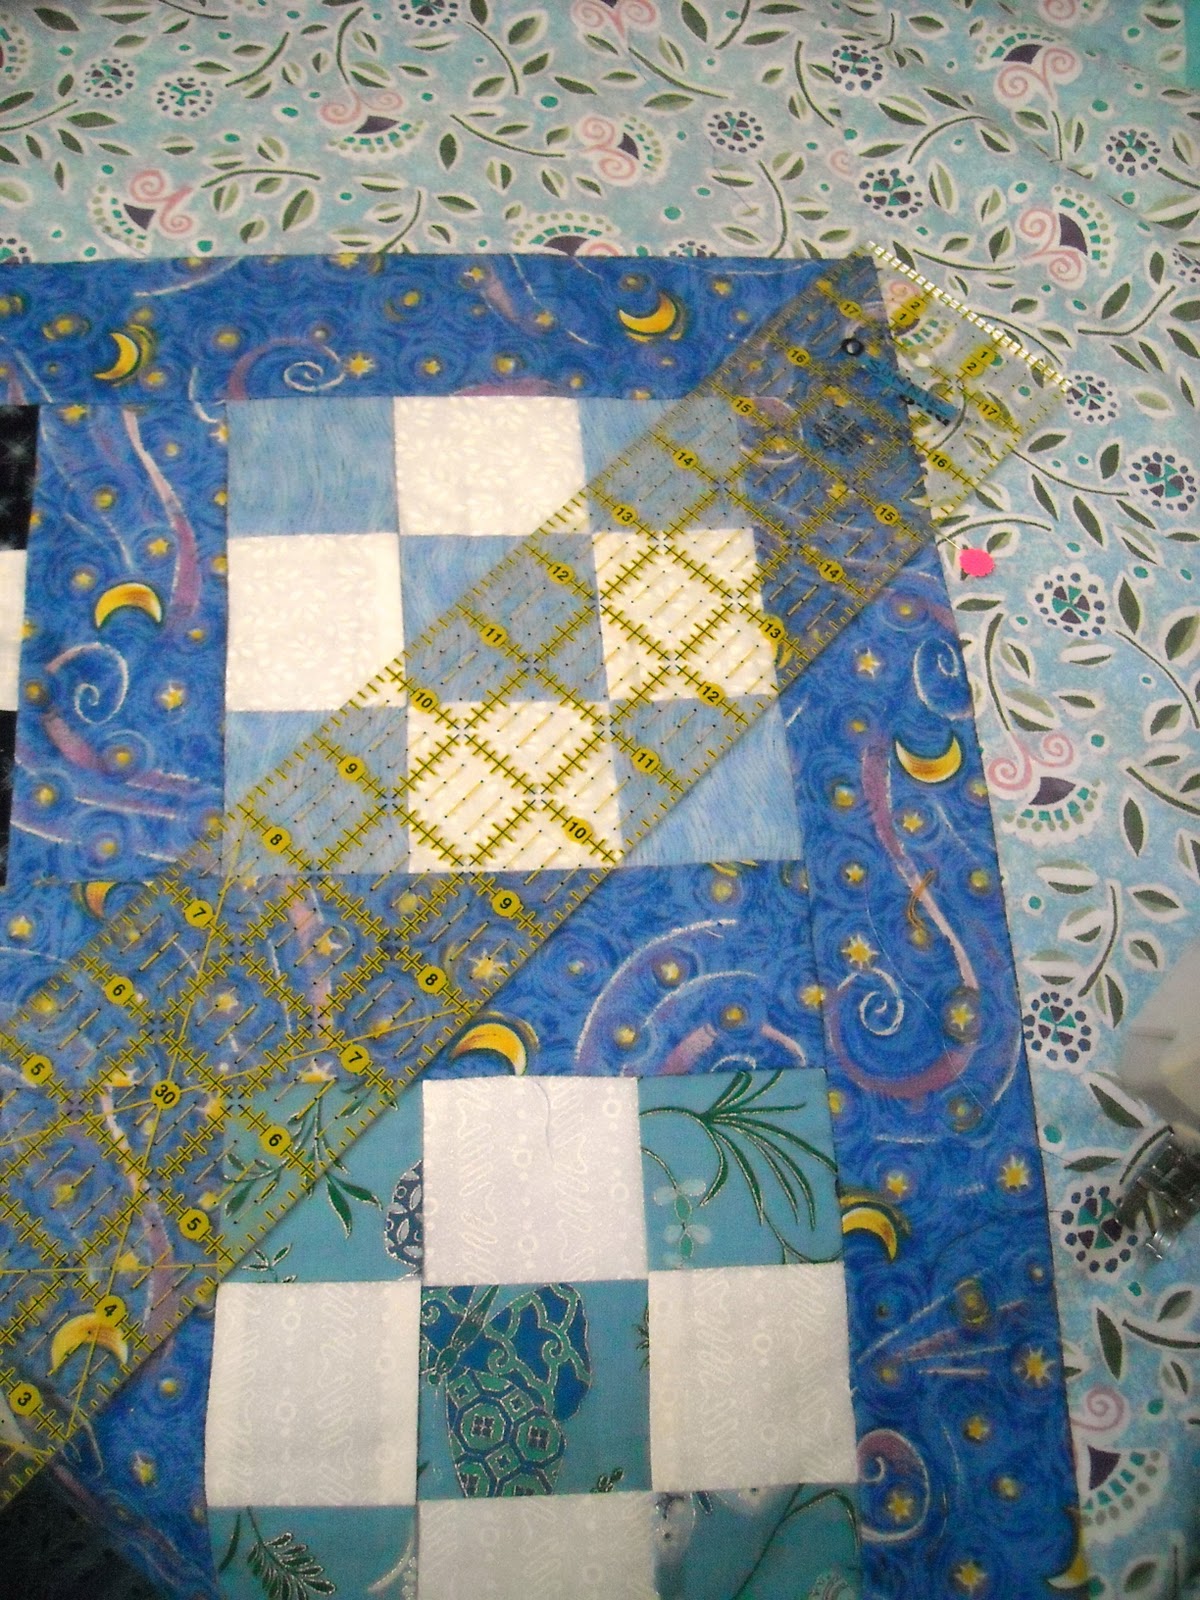
The ruler here shows more of where the line goes, right across the sashing.
You could mark this if you wanted to, but with 2 1/2" squares it's easy to just sew/corner-to-corner.
Eventually you get all the way down one side with the starts of each line.
Then you rotate the quilt and sew lines corner-to corner in all the squares that don't have a line.
Instead of an X in each square, you get this:
OK...this is a Two Purpose Picture.
One to show how the lines cross.
The other is to show what happens when those 9-Patches are not made of real squares!
What do you think...if I'd kept a straight line, it would have missed the corners. Is this less noticable? I think in whole quilt it is.
This is your side of the win-win of charity quilts... working out these problems.
So as long as I was already lop-sided, I figured I'd go all the way with experimenting and do...
A fleece binding!
I even thought I'd turn the back to the front, since there was plenty of it! So I trimmed the extra to 3/4" away from the quilt's edge. That was a totally arbitrary measurement.
Well, it would have been better to do a separate binding, as I found out.
But that's what this blog is for...so I can make the mistakes before you do!
Who knew fleece has two straight grain edges, and two stretchy edges!?!?!
Oh, maybe you did.
Anyway, I just turned the edges over and zig-zagged them in place as I went along. I am a very lazy person.
Had I realized two edges would stretch, I would have controlled them by pinning before sewing. I'd start with a pin in the center of the side, then at the ends/ corners, and then halfway in between the first pins.
That would have kept the stretching between each pair of pins, not going all the way down the side!
The wide border just has two wavy lines of quilting going all around.
I told you I am lazy!
The quilt is done and ready to be part of my guild's donation to daniel (it's not capitalized), a foundation that does intake for all the foster children in this city.
Those are the last of my President's Blocks from sometime in the late 1990's. That's what being guild president does, uses up the brain cells and memory. The rest of the blocks are made into two other quilt tops...waiting to be quilted!

Tuesday, January 26, 2010

Kooky Scrap Star Blocks

There are so many times a "scrap project" comes up, and in the end it has just created more scraps. The Kooky Scrap Stars may actually help you use some up! I am so excited!
This is a "sew & flip" method and wastes a bit of fabric...well, that's the good part because the pieces are not too large to start with, so you have a real chance of actually throwing them away!
(I cannot be held responsible for any trash basket diving later...in fact, I may meet you there...)
What is a Kooky Star?

It's related to the long-pointed star blocks like "54-40 Or Fight" or "LeMoyne Star" (also known as Lemon Star!). The skinny and fat triangles used for the traditional block were made famous by the late, great Doreen Speckman who called them Peaky and Spikey.
These amusing contemporary stars are similar to Jan Mullins patterns,so  if you'd like to do some more fun piecing, look for those!
The All Star Quilters made these blocks at my workshop yesterday. We like to start off the year with a "free" pattern class...the real cost is you have to donate the block you make so it can go into a charity quilt (more on that later).
Here's how you can make one, too. This is for a 12 inch finished block.

Cut 8-- 4.5" squares for the background (4 are the corners and 4 get the star points on them).
Cut 1-- 4.5" square for the center of the star
Cut 8 rectangles 3" x 5.25" (that's 5 and a quarter inches...fractions behind whole numbers are tricky to typre here!).
As you can see, the points are different because they came right out of my scrap basket. What you can't see is that the four corners are also a different white from the ones with the points! Mix it up, that's what I say!

Fold one side of a square and finger press to mark it (use chalk or pencil if you need to).
The first rectangle goes on with the bottom corner just to the right of the mark.
The top corner can go off the square anywhere down the left side. The closer to the bottom, the shorter & fatter the point will be. Don't over-think this! They can all be different!


You have to turn this around to sew it.  Aim for a 1/4" seam allowance, but it doesn't have to be precise.

Press over the first rectangle, then repeat for the second. You don't have to turn that side around.
I am sure there's a smoother process, but this is the way I learned it and honestly, I just have not bothered to figure it out. It doesn't really matter which point you sew first.

Here it is from the back. The two points don't even have to overlap at the fold mark, either!
The square is the size of the unit. Use it to trim off the extra fabric....then you can leave the square in, or trim it out, too, but first trim the points fabric to be the correct size.
These points are more traditional-like, because there actually is a method for doing this in a precise fashion (for those who do not like to cut triangles) but it involves lots of measuring & marking of where 1/4" seams cross...much too fussy for me!
Make 4 units...each should have 2 star points, unless you are designing another block. If you are, send me a picture!
As in any nine patch block, sew the units into rows, then sew the rows together. I pressed each row with the seams away from the points, as there are lots of layers there.

Well, you may notice that these are some mixed up points! I trimmed off all my sample pieces to set this up.
In fact, the rows are not even sewn, just stuck up on the board. But I will finish this, and add it to the mix.

I like this B&W star made by one  memeber, She went with the all-the-same-fabric method.
Another person was inspired to make two blocks in reverse fabrics/ values:

These go pretty fast once you get used to how those rectangles lay on the squares. Wouldn't this make a beautiful quilt, with just these fabrics?
Here's how the class ended:


I think a few starts went home, too...and many promised to make more and bring them to the next meeting.
With  12" blocks you can make a nice size quilt. Setting 12 blocks 3 x 4 we'll get two tops (I know you are counting, and there are only 22 starts here! I have one more and I'm sure there was another not up on display). With some 2" sashing and a 4" border, a 12 block quilt would be about 52" x 66". That's a big enough lap quilt for almost anyone, and a nice big quilt for a child....and about the limit most people want to quilt on their own home sewing machine!

The All Stars had a fabulously generous donation of over 500 yards of fabric, mostly juvenile prints and a lot of flannel. So we've been passing it out like crazy. Here's what was left on Monday:

The main project is quilts for children going into foster care, and sometimes those have a pillowcase, too.
Then there are quilts for Safe Harbor (teenage boys) and this year they have added Wounded Warriors' retreat in the Fall. Not to mention placemats for Meals On Wheels!
There is no shortage of places where quilts can be comforting gifts.

Thursday, May 22, 2008

Mystery Quilt Revealed!

The Crossroads Quilters in Perry, Georgia, were thrilled with their Mystery Quilt, and I hope you like it, too!
Most of the quilts are being made for their charity, teenagers at the Georgia Industrial Children's Home in Macon, so I designed a special long-twin size for those. The quilt you see here is the regular twin size.


This was done in EQ6...what a great program!

It will be available soon as a pattern with three sizes included (I know you want to make a bed quilt! The pattern gets even better with more blocks).

So now it is official....I have driven over 4 hours and across state lines to talk about scraps!
Call me crazy (you will not be the first OR the last!) but I do love to be together with a group of quilters, sharing our love of fabric, colors, and probably chocolate. The Crossroads Quilters are a fun group, and had an awesome Show & Tell!
Here's a look at the Famous Over-Flowing Scrap Basket in action:

It has some friends on board....Perky Old Men ( 3" nine-patches & blacks & whites), charm quilt, and a blue & yellow scrap quilt.
Yes, scrap quilts can be made in a planned color scheme, you just need lots of different fabrics of the same color. This is especially good for people who want to be scrappy but still need to keep things under control.
You true Scrap-a-holics out there know the truth, though.
The more different fabric/ prints/colors you use, the better they all go together!