Pages

Thursday, February 26, 2009

Color Mastery by Maria Peagler

Color Mastery: 10 Principles for Creating Stunning Quilts
by Maria Peagler, 2009 Willow Ridge Press


Quilters need to learn about color, and this book makes the subject easy to understand.
Find out for yourself by clicking the link (above) and reading a sample chapter.

There are many color books in my library, written from various perspectives. Maria has written this book in a way that breaks color into easy to understand families and ideas.
I think her most important move was leaving out how colors mix together. That information is what makes this topic so confusing to beginners & fabric lovers, as we really don't mix colors the way painters and lighting artists do.


Starting off with ten basic concepts and ten myths about color, Maria goes on to explain her excellent suggestion of keeping a Color Journal.
The truth is that you really have to get into some fabric and play around with it to learn about color. Reading about it will never do the trick! So why not keep a record of it in your journal? I love to go back over journals I have kept, and I bet you will, too.
NOTE: Journals are only for you! Make a mess, tear a page out, scribble like mad, glue-glue-glue! This is not an assignment you are handing in for a grade! Nobody else has to see it unless you decide to share it.


The book is filled with great color pictures that show you how to use your own fabrics to discover the color schemes you will like best.
A result of working with Color Mastery might be buying some more fabric, but you'll be selecting ones that really work with your existing stash.


One of the biggest problems quilters have with color is that they resist learning how to talk about it. You can tell if you like something or not, but without the right words and ideas, there is no way to describe the problem and understand how to change what you don't like.
Maria does a great job explaining--and showing!--what the color wheel and it's variety of combinations can do.


In the second part of the book, you can start to put your new ideas into action with some simple quilt patterns. There is a pattern for each of the main color "harmonies", but you could make any of them over and over using different colors, intensities and values as you learn what you like and how to make it look even better.


Use Color Mastery as a workbook. You'll already be started on your Color Journal!
And follow Maria's blog and e-newsletter for more insightful (and fun!) ways to make your quilts really show their colors!


So, you'd be asking, "What's with that photo???"
It's my copy of Color Mastery, purchased all on my own. I am reccommending this book because I think it is one you will use and enjoy.
What's that little thing sticking out of the top of the book?
A sticky note, of course, because when you have a really good book, you have to mark it!
And that striped fabric behind the book?
Oh, yes...that's about to be cut up and used for the backing on a quilt I am making for Mrs. Starbucks!


By the way, Color Mastery is published in a beautifully professional manner. You can order it through all the big online booksellers.
If you'd like a group discount for your guild, or to use this book in a class, contact Willow Ridge Press.

Tuesday, February 24, 2009

Florida Quilt Shop: Byrd's Nest

If you need a batik or beach print, Byrd's Nest is a great place to shop.

If you could look to the right, you'd see another wall of batiks!
Located in Ormond Beach, it's an easy trip east from I-95 on Rt. 40. There's even a shopping center across the street to provide lunch and other distractions, if you are not traveling with fellow quilters (well, the quilters want lunch,too, of course!)

Beach and ocean prints are a favorite
They have plenty of other fabrics, too, like a huge number of those oriental style prints that are so popular, and just in was a nice line of red & whites. There are also several bolts of the hard-to-find batik rayons, a wonderful choice for anyone making clothing.


The fat quarters corner...a must-stop & browse section in this house o' fabric!

I had fun checking out the new Pfaff machines, too. A sewing machine is like a car...there are many makes & models to choose from, and it's a very personal choice. But I do like a Pfaff!

I love to shop in places were there are all sorts of rooms with things to find!

Here's a storage idea worth taking a picture...so I did!
Industrial shelving with chipboard or masonite shelves, and the "under-bed" size plactic boxes (no lids needed...though I bet these make an easy pack up for a quilt show booth!).
You can see the shelves were set to be just the distance needed between the boxes, and they sit two side by side on each of the eight shelves.
That's a lotta fabric!

There's another location at the Rt. 100 exit off I-95, Byrd's Nest II. Don't miss either of them!

Tuesday, February 17, 2009

Quirky Bits in Quilting Class

The Martin County Quilters were ready for Quirky Bits!
After my "Taming the Scrap Basket" lecture the night before, they showed up with wonderful fabrics, ready to get scrappy and have some fun!

What a great place for a quilt class...one of the community centers at Pinelakes Gardens and Estates in Stuart, FL. Nice and bright, lots of tables and helpful people...but, as usual almost everywhere, don't forget the extension cords!

Besides meeting wonderful quilters, one of the interesting things about teaching is figuring out how to use the space available, which of course you have not seen beforehand.
These double stacked chairs made an excellent holder for my portable design walls.

Quirky Bits was designed to use scrappy little 3" blocks.
The original is on the right. Cherry-Cherry made the lovely monochromatic version on the left.
The Martin County Quilters had a number of aproaches to "QB".
One person had a wide selection of purple batiks for a one-color quilt, while several others took advantage of the coordinated-yet-varied jelly rolls. A few actually had scrap strips:


.... one person came totally organized:


This scrap basket was beyond "tamed". It was completely house-broken!
We were all in awe of this.
And if some of us laughed, inside we were all envious and wished our strips were so well arranged.

It never takes quilters long to find this bowl of chocolate and mints.
It is for medicinal purposes, and it's a good thing I bring it along. Even a fun class can be stress inducing, so almost everyone needs to make at least one trip to the bowl!

The Martin Co. Quilters are only three years old, and I feel quite honored to be the first teacher/ speaker they have hired. They are forming up into a very large and active guild with a great future.

Sunday, February 15, 2009

Florida Quilt Shop: The JaM Patch

When you are headed south on I-95 in Florida, and get down to Stuart, be sure to take a little side trip to The JaM Patch. I had the pleasure of a visit while I was in the area teaching for the Martin Co. Quilt Guild.
It's located at 932 SE Central Parkway, Stuart FL 34994.


Owners Joey Mettly and Margy Merle (the J and M of "JaM") have made the most of their cozy space. It is totally loaded with fabric!
There is something for everyone, with reproductions and country colors to the left of the door ( see above).....
and the brights to the right (see below)...

And a ton of batiks in the back, just before you get to the wall of discounted bolts.
It took quite awhile to glance over all the offerings, and then I had to choose some to keep me company on the way home!
(well, there's another good reason to buy fabric!)

This what I picked out...and believe me, I left a quite a bit behind that I would have loved to get!

On the left is a fat quarter I couldn't live without. It was all gone from the bolt.
In the middle are two cherry fat quarters, and the fabric on the right is called Chocolate Covered Cherries. Do we detect a theme?????
And as long as I was getting cherries, how could I resist this beautiful stuff?

That's from a Wilmington line called "Cherry Picked".
Could cherries be the New Thing? Will they replace sunflowers and cats????
Even more important....can you guess what I'm going to do with this? And who will be the beneficiaries???

Meanwhile, back in my own little world....

Yep, veggies and batiks! That's me all the way. I had a good "excuse" to buy the blues, since I recently found out they were not so well represented in my batik stash.
The retro-style veggies were just too cute ( I have a highly developed sense of "cute", probably not what others consider that to be). And I have not added to my (oh, dear it's true...) Veggie Fabric Collection in some time.

It looks as though I shall be under a huge amount of temptation in the next week, as the BGPC is going to Brunswick GA for an art show...and a stop at Stepping Stones on St. Simon's Island.
The following day Cherry-Cherry & I are headed to the
Sunshine State Quilters Association meeting in Ormond Beach, a trip that involves very dangerous proximity to some great FL shops.
Of course, I will let you know what trouble I get into there.
And looming on the horizon.....
PADUCAH!
The truth is, I don't buy much of anything but fabric (and lunch!), so this is my way of investing in the Economic Recovery. I know you are doing your part, too!

Wednesday, February 11, 2009

Batik Bonanza?

The growing mound of batik fabric in my office (which belongs in my studio) finally caused me to take a hard look at my "fabric acquisition" habits.
I can't say it wasn't a pretty picture...

....but on the other hand, it was an awful lot of fabric. As in Webster's fouth definition: "exceedingly great".

Sometimes the way to deal with a problem is to figure out how big it actually is, such as "a few drinks" or "a few pounds" really meaning "an awful lot"!

I got all the pieces, which range in size from fat quarters to a couple yards, and divided them by color. That in itself was an interesting project, because I really don't know what color some of them are, even with making a stack called Multi-colored.

It turns out I have a huge collection of greens. I didn't want to count them, or weigh them...so I just layered them along my ironing board so you could take a peek, too!


Let me put it this way: it took two ironing boards full to get all these photos!
And these are just the green ones.
And not even all of them, as I had already pulled several for my newest quilt.

This is my plan for dealing with this so-called "problem": I am going to use batiks to make all the upcoming samples I need.
That's going to be at least three quilts! Two of them are Mystery Quilts, so you'll have to wait until April and August to see those. Sorry about that.

But wait...there's more:


And even more:


Are you disgusted yet?
No, I didn't think so. I'm not either. Not really.

So it all went back into the laundry basket it came from. It's friends (Orange, Teal, Purple, Yellow, Blue, Brown and Multi-color) are all still sitting on my futon.

They'll have to wait until I get back from my trip to the Martin Co. Quilters tomorrow and Friday. I'll be sharing that over-flowing scrap basket again (oh! oh! I am detecting a continuing theme in terms of fabric & me!) in an evening lecture. The next day is an all-day class of "Quirky Bits". I'll try and get a few photos to let you in on all the fun!

I know all that batik fabric will be waiting for me when I get home.
Meanwhile, I need to stop thinking about all the wonderful quilt shops there are just off I-95 during my four-hour drive!


Saturday, February 7, 2009

Promised Details & Piano Keys

At last I can catch up on a couple details that have been missing.... not to mention an entire post!
It is published below "Midnight Mystery Quilt Revealed" (Feb. 4). Scroll on down to see "BLOOMS". There are some nice pictures of class projects.
That what happens when you write something but forget to change the date.

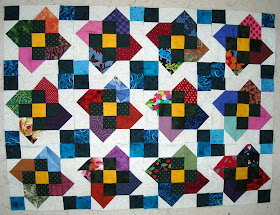
Meanwhile, how about those scrappy Mystery Quilt blocks finally sewn together?
I went with the sashing style setting to get those floating 9-Patches, and to make a larger quilt.
It's going to want quite a bit of background quilting!
So what can you do with something so incredibly scrappy?
Add more scraps, of course!
There's nothing like a "piano key" border to use up some strips....

How To Make a Piano Key Border
Start with one long strip, and place another strip on it, right sides together. They do not need to be the same length. Begin sewing with a 1/4" seam. When you get to the end of the top strip (assuming it is shorter) just put another strip on and keep sewing.
You may continue adding strips to the top or bottom as needed, or cut off whichever strip is longer (then use that piece to help fill up another strip).
After sewing quite a few sets (it is hard to determine ahead how much you will actually need), cut them into sections that are the width of the border you want.
I cut this border 4.5" because that is the cut size for the rectangles in the block pattern. One of my best guidelines is when you need to figure a size for something in the border, use a unit from the block.

Now that you have a bunch of little strip pairs, you can figure how many are needed for each side of the quilt. Just sew them together with wild abandon (according to how much you really need to be in control...). Remember, this is scrappy!

Finally, and very important, is to run a line of stay stitching along what will be the outside edge. (Of course, I learned this the hard way!). That will keep the many seams from opening up before you get the quilt done, and keep the edges from stretching.
You can see the stitching in the picture below. It will get covered when you put on the binding.

If you like to have lots of control/ order/ etc. , I might suggest making dark & light strip sets, which do look like piano keys, especially in black & whites! A great border for a musical quilt, of course.For those working with jelly rolls, you might even like to position all the colors so they progress through the color wheel order, or maybe shade the values from light to dark and back again, making a wave-like effect.

And whatever did happen to that crazy striped fabric that would have scared the groundhog back into his burrow? (Feb. 2)
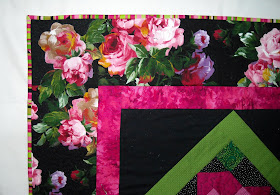
It did become the binding on my latest-but-still-needs-more-quilting creation, "Roxanne's Honeymoon"!

What do you think...some big roses quilted into those plain black setting triangles? With pink thread? Ooo-la-la!

Wednesday, February 4, 2009

Midnight Mystery Quilt Revealed!

I am very happy to at last be able to show you the Mystery Quilt for the retreat in Panama City! These blocks are from a very scrappy version I did right out of my scrap basket. OK, except for the background.

This is how the blocks look set side by side:


Blocks with squares in each corner have some interesting design options

When you make a scrap quilt, it's nice to have one element provide some unity.
I used all the same fabric for the center squares. The others squares that form a cross around the center are all dark green, but I used three different fabrics (all from the scrap basket, remember!)
With the blocks set together, I knew the corner squares would form a 4-patch, so I used different values of teal. The fabrics are the same in opposite diagonal corners.

Here's how the blocks look set up with a sashing:

By using a cornerstone, and matching the sashing to the background, you can create a floating 9-patch! It's like getting two blocks for one!
Now this whole thing was planned for using 2.5" strips, but I think it would look even better with a narrower sashing strip and smaller cornerstone. You'd still have that 9-patch, but it would have large cornersand a small center.

I want to finish this up at least to a top, so I decided to stick with the fabric already cut. I needed more of the background.
Of course, I had yards & yards of it...so where did it go???
I could not find it anywhere! And having cut from it recently, it could not have gotten completely lost.
About the time I was making Plan B, and feeling both disappointed & confused, I found the fabric!

For once I had attempted to use up all of a fabric, and I had sewn the rest to make up the backing for a quilt I have yet to baste!
Eureka!
And yes...I did rip up that back (it wasn't such a good choice anyway) to get the few strips I need to complete the Mystery Blocks top. That is, if I would get off the computer and go do the sewing! It will make a nice comparison picture between blocks stuck on a design wall and the same blocks sewn together.

I do want to thank all the brave quilters at the retreat for participating in the Mystery. They boldly sewed where no group had sewn before! They even did the dreaded partial seam construction I sneaked in, and handled it like champs. (It's not hard, it just sounds like something nobody wants to do!).
Their machines were set up in the three different-but-connecting classrooms, so I really got a workout that night.

I wrote the "clues" for making one block, as it was an evening event and some people do like to go to bed! Not to mention they were not totally invested into a quilt that they wished was made with different colors or fabric placement. But the blocks were beautiful, and many people were excited about continuing to make a top, because, of course, I had also provided the cutting instructions to make a 12 block quilt!

And I did say I'd show you the other quilt I made using these blocks in a very different way, but I'm finishing the binding made with the wild pink/ green/black striped fabric. It should be done soon, and then you will see "Roxanne's Honeymoon".


BLOOMS in Panama City

Last weekend at the Quilters Paradise retreat, hosted by Quilting By the Bay, my new pattern debuted.
After teaching "Blooms For Beginners & Other Flower Lovers" as a class for 5 or 6 years, I bowed to the many requests to turn it into a pattern.

The original wallhanging became the pattern cover


It is interesting to recall that this is yet another project inspired by Cherry-Cherry, who one day mentioned that some people would like to learn quilting, but don't want to make a Bear Paw or Ohio Star or other traditional blocks. They would like something contemporary or "artsy".
So I devised BLOOMS to teach some basic quick-piecing methods, with none of the seams needing to match, and even sneaked in designing-on-a-grid!

As most of my classes, this is basic enough for beginners, but provides a great creative "canvas" for the more experienced quilter to really take off on.
Here are some of the pieces done at the retreat:
Some students enjoyed making two-fabric flowers


Others made one-fabric flowers from two different fabrics
(I really like the reversed colors in this one!)


Fantasy flowers made of checked fabric! Beautiful!


And what happened to the other photos? I sure wish I knew! I am sorry to be missing the ones of the three ladies who had purchased kits made up for the class by QBTB. They all had red flowers, and each one was quite different!
We had lots of fun watching all the BLOOMS come into full flower, and discussing plans to embellish and quilt in some wonderful details.

Here is a picture of my teacher's table. Wasn't it nice to have a cup that matched my quilt?

The flowers in the original BLOOMS were made from one fabric that shaded orange to purple.
The lap size sample has shaded pink flowers.

Draping over the edge there is the lap quilt size I am still working on. It had borders, and I took them off because I really want to experiment with some checkerboard ideas.

So many quilts...so little time!
Electric Quilt helps a lot to run through ideas about settings, values, colors, etc. but eventually it just has to be done in fabric.

Monday, February 2, 2009

The Day of the Groundhog

Once agin, I wish you a very happy Groundhog Day!
If you'd like to read more about my friend, here's a link to last year's post: http://patchworkpie.blogspot.com/2008/02/lessons-from-groundhog.html
What would happen if the Groundhog came out of his hole and saw this:


I am guessing he'd head straight back inside, and Spring would come in a month and a half.....just as if he'd seen his shadow.
But if he liked this fabric, and stayed outside to consider what use to put it to, we would be having six more weeks of Winter.

You really cannot argue with the Woodchuck (another name for groundhogs). The second of February has been a weather-predicting day for centuries.
Oddly enough, that fabric is a bit like the Sunshine & Shadows block, a perfect choice for Groundhog Day:

There are no groundhogs here in Florida, sad to say.
But the ones up north would love to see THIS when they pop out on February 2nd:

Now that's the actual shot-out-the-window view from my room at the Quilting By the Bay retreat last weekend!
What a great time I had...and I will tell you more about it tomorrow!
(and that fabric....it's the binding on my latest quilt, Roxanne's Honeymoon! Look for that tomorrow as well!)